Runner scripts and pipelines
Week 6 - part I
Overview
This week, we will see different ways to write and run analysis pipelines. Here, we’ll talk more about runner scripts and you’ll get introduced to formal pipelines. In the second session, we’ll run a best-practice Nextflow pipeline for RNA-seq analysis.
While thinking about different ways to organize and run your analyses, let’s have an example in mind with a simple RNA-seq analysis that:
- Trims reads in FASTQ files (independently for each sample)
- Maps (aligns) reads to a reference genome (independently for each sample)
- Creates a gene expression count table from the alignments (for all samples together)

between the steps: the output of one step is the input of the next.
The example only has 3 samples, and the first two steps are executed separately
for each sample, while the last step is executed once for all samples.
1 More on runner scripts
In the past two weeks of this course, we have created a few “runner scripts” (usually named run/run.sh): digital notebook-like scripts that we ran line-by-line in order to run (week 4) or submit as batch jobs (week 5) our “primary scripts” (e.g. scripts/fastqc.sh).
These runner scripts were useful to store that code instead of typing it directly in the terminal, especially because we were passing arguments to our script and running loops — not only would this be tedious to type, but it would also reduce reproducibility if we didn’t store exactly how we ran our scripts.
However, our runner scripts so far have been very short. In the context of a research project that would include running a series of steps with different bioinformatics tools (and perhaps custom scripts), the idea would be to include all these steps in such a runner script. For example, for the above-mentioned RNA-seq analysis, such a runner script could look like so:
# [hypothetical example - don't run this]
# Define the inputs
fastq_dir=data/fastq
ref_assembly=data/ref/assembly.fna
ref_annotation=data/ref/annotation.gtf

# Trim the reads:
for R1 in "$fastq_dir"/*_R1.fastq.gz; do
    # (The trim.sh script takes 2 arguments: R1 FASTQ and output dir)
    sbatch scripts/trim.sh "$R1" results/trim
done

# Align (map) the reads to a reference genome assembly:
for R1 in results/trim/*_R1.fastq.gz; do
    # (The map.sh script takes 3 arguments: R1 FASTQ, ref. assembly, and output dir)
    sbatch scripts/map.sh "$R1" "$ref_assembly" results/map
done

# Count alignments per sample per gene using the annotation:
# (The count.sh script takes 3 arguments: input dir, ref. annotation, and output dir)
sbatch scripts/count.sh results/map "$ref_annotation" results/count_table.txt
The code above runs a primary shell script for each of the three steps (trim.sh, map.sh, andcount.sh): each of these takes arguments and runs a bioinformatics tool to perform that step (for example, TrimGalore for trimming).
Here are some advantages of using such a script structure with flexible (i.e., argument-accepting) primary scripts, and an overarching runner script:
- Rerunning everything, including with a modified sample set, or tool settings, is relatively straightforward — both for yourself and others, improving reproducibility.
- Re-applying the same set of analyses in a different project is straightforward.
- The runner script is a form of documentation of all steps taken.
- It (more or less) ensures you are including all necessary steps.
2 Pipelines
What exactly do we mean by a “pipeline”? We may informally refer to any consecutive series of analysis steps as a pipeline. The above runner script, in particular, can informally be called a pipeline. But here, I am using pipeline in a stricter sense to mean a series of steps that can be executed from start to finish with a single command.
An advantage of a true pipeline is increased automation, as well as “supercharging” all the above-mentioned advantages of runner script. For example, a pipeline truly ensures that you are including all necessary steps.
But wait, can we not just run our runner script with a single command: bash run/run.sh? (Click to expand)
This doesn’t work because we are submitting batch jobs in each step. Because the script would continue to the next line/submission immediately after the previous lines, all jobs would effectively be submitted at the same time, and e.g. the mapping script would fail because the trimmed reads it needs are not yet there. (Below, we’ll briefly talk about ways around this problem.)
To turn our runner script into a pipeline, we would need to overcome the problem of simultaneous batch job submission. Additionally, a pipeline worth its salt should also be able to detect and stop upon failure, and to rerun parts of the pipeline flexibly. The latter may be necessary after, e.g.:
- Some scripts failed for all or some samples
- You added or removed a sample
- You had to modify a script or settings somewhere halfway the pipeline.
So how could we implement all of that?
Push the limits of the Bash and Slurm tool set
Useifstatements, many script arguments, and Slurm “job dependencies” (see the box below) — but this is hard to manage for more complex workflows. Alternatively, if you only want to solve the simultaneous batch job problem, you can put all steps in a single script, but this would make for a very inefficient pipeline.Use a formal workflow management system.
We’ll talk about these some more below.
First, here are some low-tech, ad-hoc solutions to rerunning parts of the workflow:
Comment out part of the workflow — e.g., to skip a step:
# Trim:
#for R1 in data/fastq/*_R1.fastq.gz; do
#    sbatch scripts/trim.sh "$R1" results/trim
#done

# Align (map):
for R1 in results/trim/*_R1.fastq.gz; do
    sbatch scripts/map.sh "$R1" results/map
done

# Count alignments per sample per gene:
sbatch scripts/count.sh results/map results/count_table.txt
Make temporary changes — e.g., to only run a single added sample:
# Trim:
#for R1 in data/fastq/*_R1.fastq.gz; do
    R1=data/fastq/newsample_R1.fastq.gz
    sbatch scripts/trim.sh "$R1" results/trim
#done

# Align (map):
#for R1 in results/trim/*_R1.fastq.gz; do
    R1=results/trim/newsample_R1.fastq.gz
    sbatch scripts/map.sh "$R1" results/map
#done

# Count - NOTE, this steps should be rerun as a whole:
sbatch scripts/count.sh results/map results/count_table.txt
Second, here are some more bespoke code-based solutions:
Command-line options and
if-statements to flexibly run part of the pipeline (and perhaps change settings):trim=$1 # true or false map=$2 # true or false count=$3 # true or false if [[ "$trim" == true ]]; then for R1 in data/fastq/*_R1.fastq.gz; do bash scripts/trim.sh "$R1" results/trim done fi if [[ "$map" == true ]]; then for R1 in results/trim/*_R1.fastq.gz; do bash scripts/map.sh "$R1" results/map done fi if [[ "$count" == true ]]; then bash scripts/count.sh results/map results/count_table.txt fiSlurm job dependencies — in the example below, jobs will only start after their “dependencies” (jobs whose outputs they need) have finished:
for R1 in data/fastq/*_R1.fastq.gz; do
    # Submit the trimming job and store its job number:
    submit_line=$(sbatch scripts/trim.sh "$R1" results/trim)
    trim_id=$(echo "$submit_line" | sed 's/Submitted batch job //')

    # Submit the mapping job with the condition that it only starts when the
    # trimming job is done, using '--dependency=afterok:':
    R1_trimmed=results/trim/$(basename "$R1")
    sbatch --dependency=afterok:$trim_id scripts/map.sh "$R1_trimmed" results/map
done

# If you give the mapping and counting jobs the same name with `#SBATCH --job-name=`,
# then you can use '--dependency=singleton': the counting job will only start
# when ALL the mapping jobs are done:
sbatch --dependency=singleton scripts/count.sh results/map results/count_table.txt
Two quotes from this article:
Typically, researchers codify workflows using general scripting languages such as Python or Bash. But these often lack the necessary flexibility.
Workflows can involve hundreds to thousands of data files; a pipeline must be able to monitor their progress and exit gracefully if any step fails. And pipelines must be smart enough to work out which tasks need to be re-executed and which do not.
3 Workflow management systems
Pipeline/workflow tools, often called “workflow management systems” in full, provide ways to formally describe and execute pipelines. Advantages of these tools are improved automation, flexibility, portability, and scalability1.
- Automation
- Detect & rerun upon changes in input files and failed steps.
- Automate Slurm job submissions.
- Integration with software management.
- Easily run for other data sets.
- Flexibility, portability, and scalability
This is due to these tools separating generic pipeline nuts-and-bolts from the following two aspects:- Run-specific configuration — samples, directories, settings/parameters.
- Things specific to the run-time environment (laptop vs. cluster vs. cloud).
The two most commonly used command-line based options in bioinformatics are Nextflow and Snakemake. Both have their pros and cons, but we’ll focus on Nextflow here.
Learn to write pipelines?
Most workflow tools are small “domain-specific” languages (DSLs), often a sort of extension of a more general language: for example, Python for Snakemake, and Groovy/Java for Nextflow.
Learning one of these tools is harder than it should be, in my opinion — a truly excellent workflow tool does not yet exist, and may not appear in the near-future either because existing options have become entrenched. Therefore, learning to write your own pipelines with one of them is probably only worth it if you plan to regularly work on genomics/bioinformatics projects.
If you decide not to do this, I recommend that you instead use runner scripts as taught in this course. This week’s exercises and your final project can help you get some more practice with these.
Either way, for many kinds of omics data, it is also possible (and a great idea) to use publicly available pipelines written with one of these workflow tools, and we’ll practice with that next.
4 nf-core pipelines
Among workflow tools, Nextflow has by far the best ecosystem of publicly available pipelines. The “nf-core” initiative (https://nf-co.re, Ewels et al. 2020) curates a set of best-practice, flexible, and well-documented pipelines written in Nextflow:

For many common omics analysis types, nf-core has a pipeline. It currently has 58 complete pipelines — these are the four most popular ones:
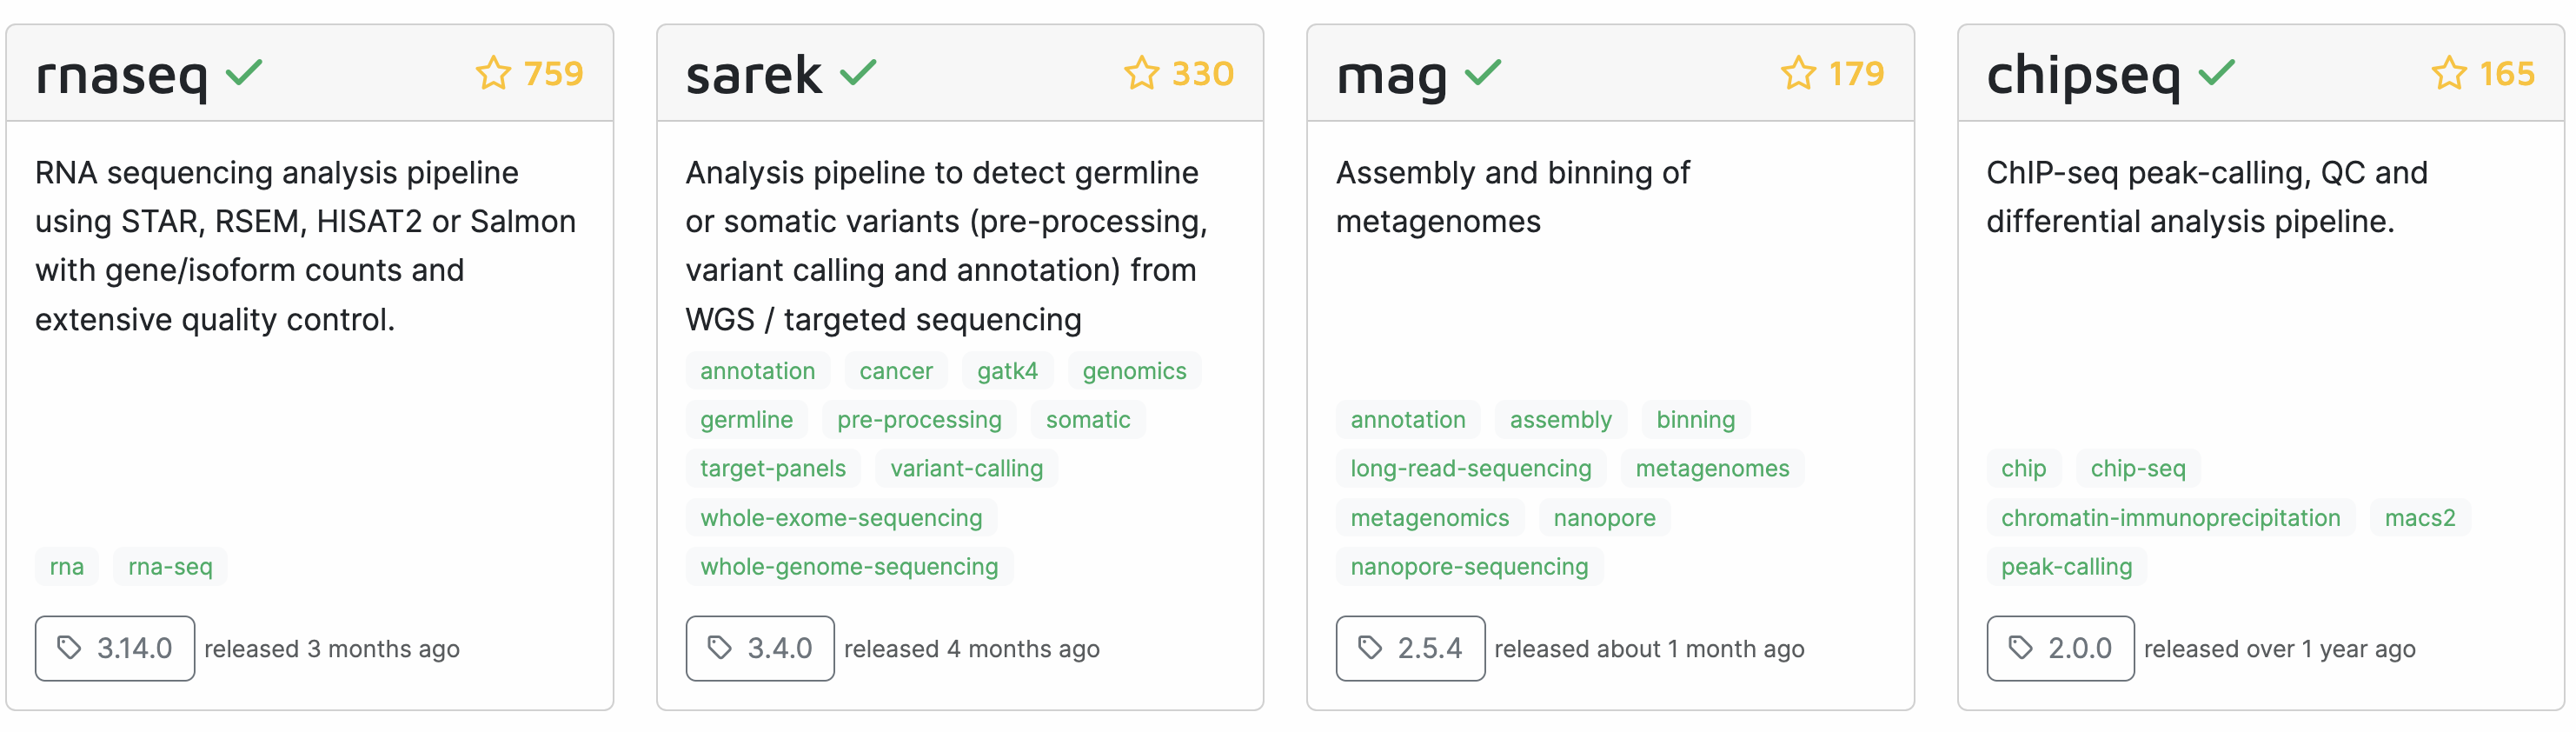
Let’s take a closer look at the most widely used one, the rnaseq pipeline, which we’ll run in the next session:
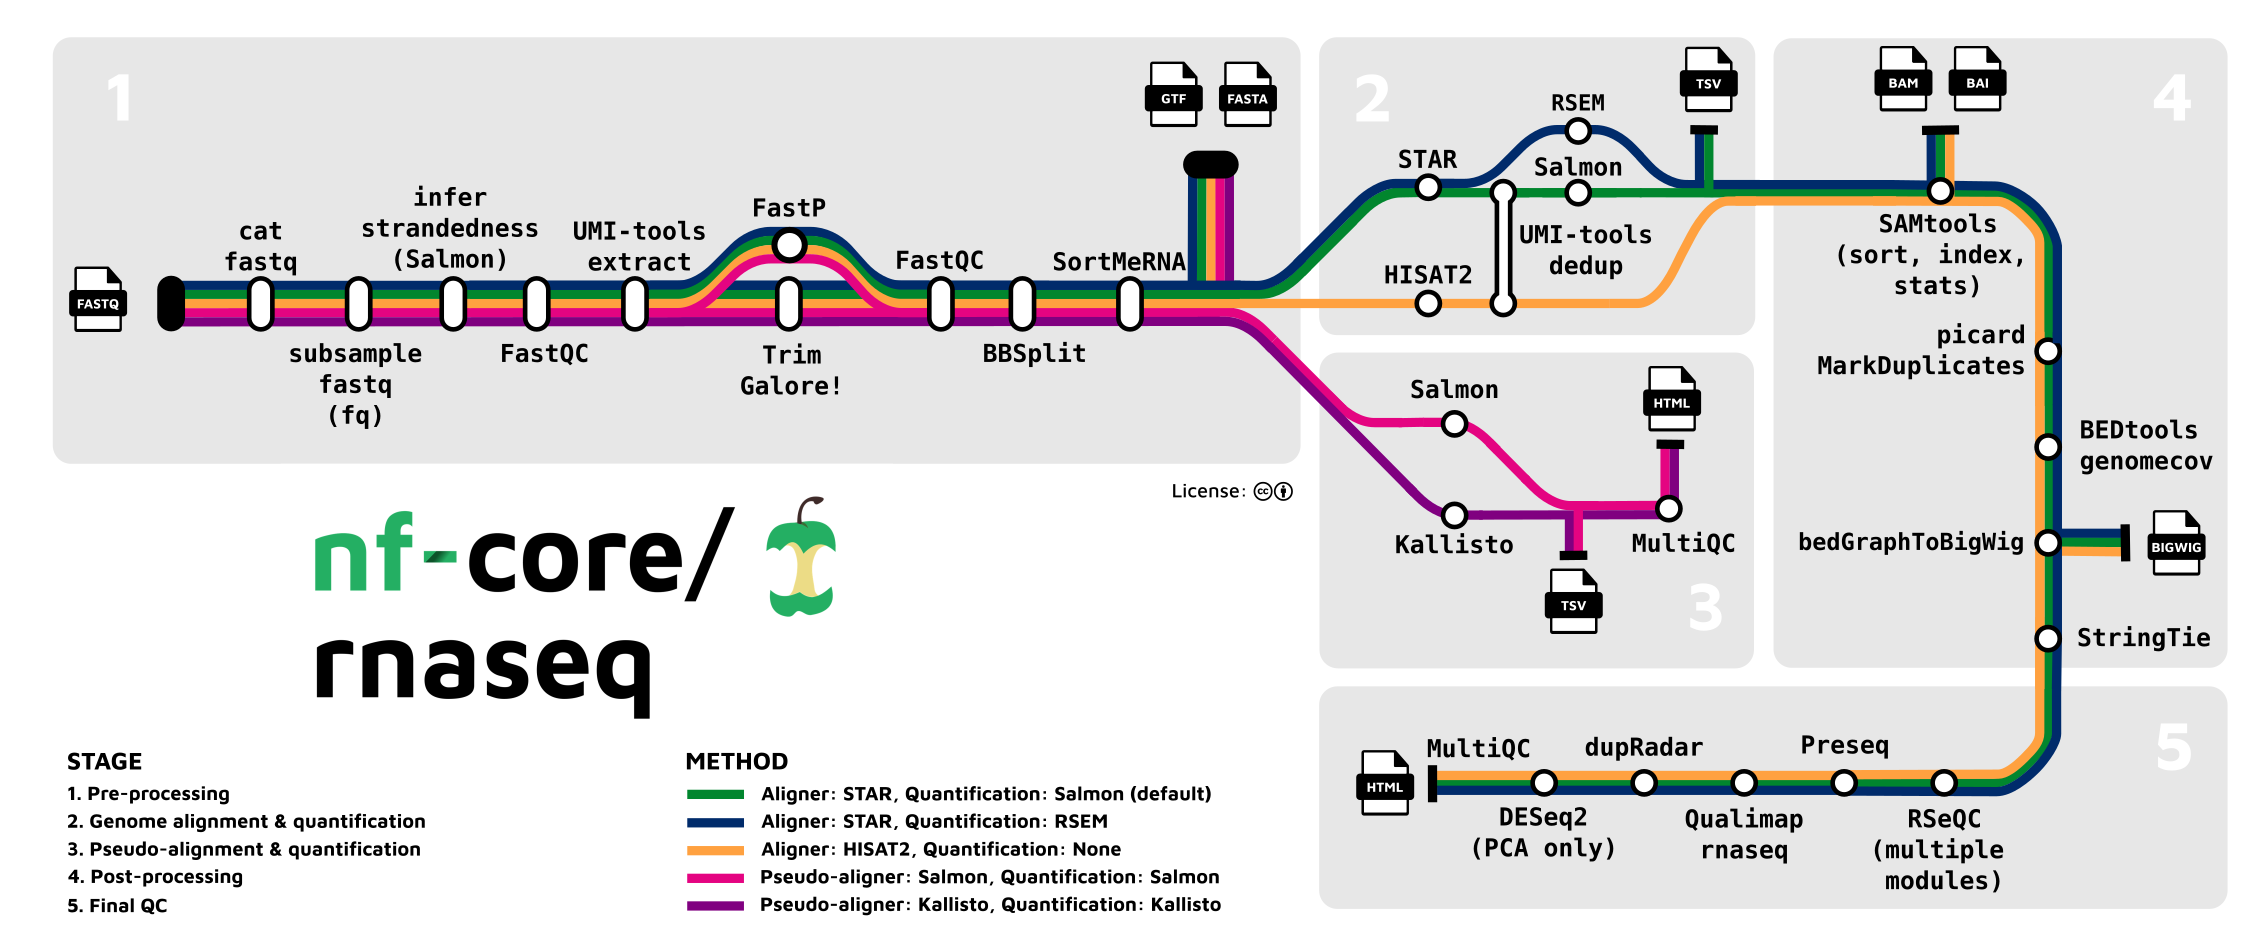
There is often a bewildering array of bioinformatics programs for a given type of analysis, and it can be very hard and time-consuming to figure out what you should use. An additional advantage of using an nf-core (or similar) pipeline is that you can be confident that it uses a good if not optimal combination of tools and tool settings, since most of these pipelines have been developed over years by many experts in the field, and are also continuously updated.
Footnotes
That’s a lot of big words!↩︎