A closer look at OSC
Week 5 - part I
In this short session, we will touch on some aspects of the Ohio Supercomputer Center (OSC) that we did not talk about during our initial OSC introduction in week 1 of this course.
OSC Projects
In this course, we are exclusively using the course’s OSC Project PAS2700. When you use OSC for your own research project, you would use a different OSC Project, one that’s likely either specific to a research project or grant, or that is your lab/PI’s general use OSC Project.
Generally, only PIs request OSC projects, and they typically manage them as well. OSC has this page with more information on how to do so. Whoever manages an OSC Project can add both existing OSC users and new users to the Project. Anyone added to an OSC Project will have access to the project’s directories, and will be able specify this Project when issuing compute node resource requests.
OSC will bill OSC Projects (not individual users), and only for the following two things:
- File storage in the Project Storage file system
- Compute node usage per “core hour” (e.g. using 2 cores for 2 hours = 4 core hours)
The prices for academic usage are quite low (see this page for specifics), and at OSU, they are often covered at the department level so individual PIs often do not have to directly pay for this at all.
Hierarchical components
In week 1, you learned that a supercomputer center like OSC typically has multiple supercomputers, each of which in turn consists of many nodes. But I omitted a fourth “level” in this hierarchy:
- Core / Processor / CPU / Thread — Components of a computer/node that can each (semi-)independently be asked to perform a computing task like running a bioinformatics program. With most bioinformatics programs, you can also use multiple cores for a single run, which can speed things up considerably. While these four terms are not technically all synonyms, we can treat them as such for our purposes.

File systems
Let’s expand our earlier list of file systems, and look at this table in a bit more detail:
| File system | Located within | Quota | Backed up? | Auto-purged? | One for each… |
|---|---|---|---|---|---|
| Home | /users/ |
500 GB / 1 M files | Yes | No | User |
| Project | /fs/ess/ |
Flexible | Yes | No | OSC Project |
| Scratch | /fs/scratch/ |
100 TB | No | After 90 days | OSC Project |
| Compute | $TMPDIR |
1 TB | No | After job completes | Compute job |
We’ve been working in the “Project dir” (/fs/ess/) for this course’s OSC project PAS2700. When you use OSC for your own research project with a different OSC Project, I would recommend that you also work mostly in the Project (/fs/ess/) dir, which offers backed up, permanent and flexible amounts of storage.
One other hand, Scratch dirs are temporary and not backed up, while the storage space of Home dirs is limited and cannot be expanded1. Compute storage space is linked to compute jobs and extremely fleeting: as soon as the compute “job” in question has stopped, these files will be deleted. So when are non-Project file systems useful?
- Your Home dir can e.g. be useful for files that you use across projects, like some software.
- Scratch has the advantages of having effectively unlimited space and much faster data read and write (“I/O”) speed than Home and Project space. It therefore regularly makes sense to run analyses on Scratch, and copy over files that you will continue to need.
- Compute storage has even faster I/O so can be useful for very I/O-intensive jobs — but using it requires some extra code in your script2 and for better or worse, I personally end up using this very rarely.
Home and Project directories are backed up daily. You don’t have direct access to the backups, but if you’ve accidentally deleted important files, you can email OSC to have them restore your files to the way they were on a specific date.
File systems are shared among OSC’s clusters, such that you can access your files in the exact same way regardless of which cluster you have connected to.
Compute nodes
Compute nodes come in different shapes and sizes:
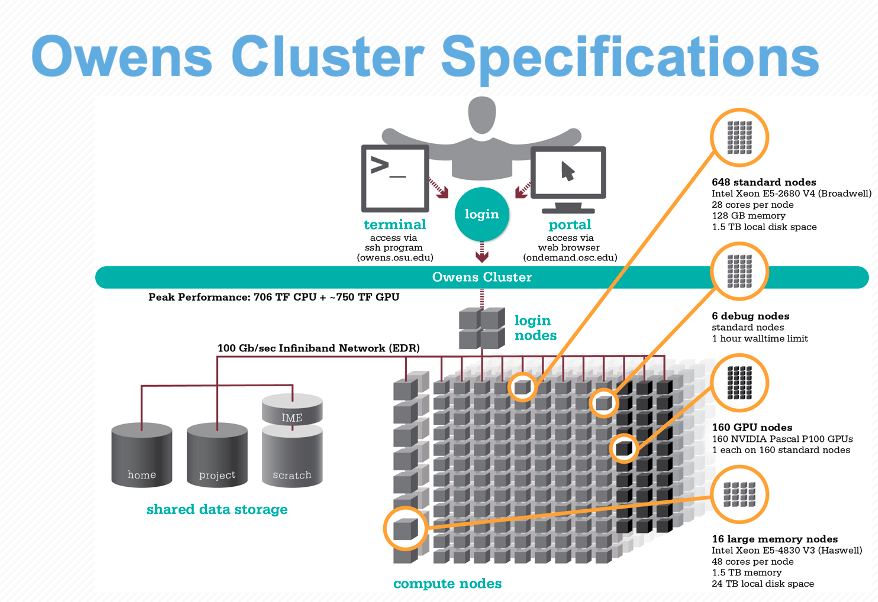
- “Standard nodes” are by far the most numerous (e.g., Owens has 648 and Pitzer has 564) and even those vary in size, from 28 cores per node (Owens) to 48 cores per node (the “expansion” part of Pitzer).
- Some examples of other types of nodes are nodes with extra memory (
largememandhugemem) and nodes that provide access to GPUs (Graphical Processing Units) rather than CPUs.
Standard nodes are used by default and these will serve you well for the majority of omics analysis. But you may occasionally need a different type of node, such as for genome or transcriptome assembly (you’ll need need nodes with a lot of memory) or Oxford Nanopore sequence data base-calling (you’ll need GPUs).
When we talk about “memory”, this refers to RAM: the data that your computer has actively “loaded” or in use. For example, if you play a computer game or have many browser tabs open, your computer’s memory will be heavily used. Genomics programs sometimes load all the input data from disk into memory to allow for fast access, or they will hold a huge assembly graph in memory, and therefore may need a lot of memory as well.
Don’t confuse memory with file storage, the data that is on disk, some of which may have been unused for years.
Using compute nodes
You can use compute nodes by putting in a request for resources, such as the number of nodes, cores, and for how long you will need them. These requests result in “compute jobs” (also simply called “jobs”).
Because many different users are sending such requests all the time, there is software called a job scheduler (specifically, Slurm in case of OSC) that considers each request and assigns the necessary resources to the job as they become available. We’ve already been running compute jobs by running VS Code via OnDemand, and we will talk about submitting scripts as “batch jobs” this week.
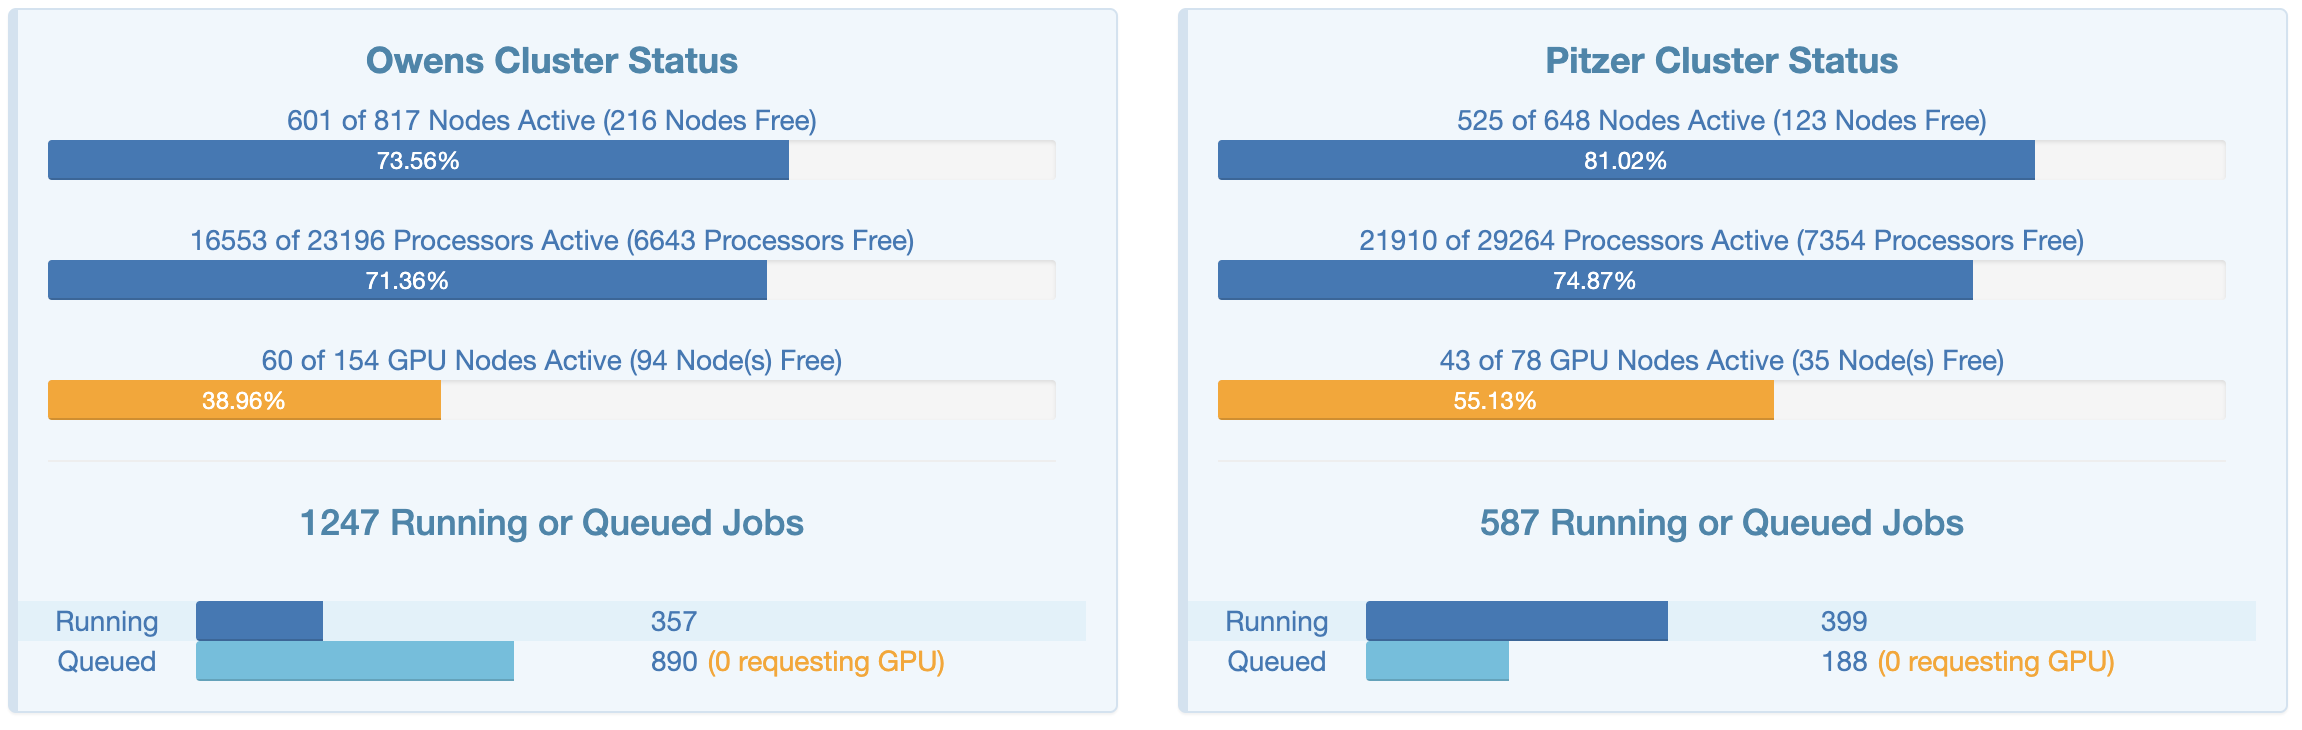
At OSC OnDemand, we can get an overview of the current-minute usage of the OSC clusters by clicking on the “System Status” item in the “Clusters” dropdown menu:
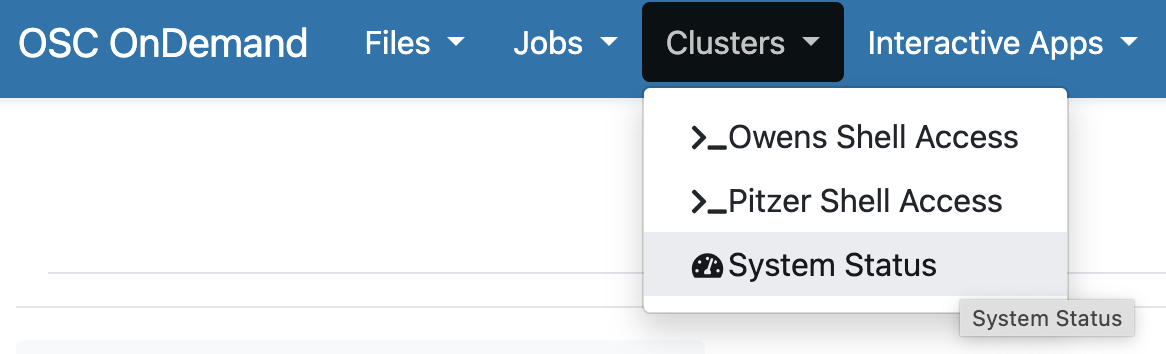
This page shows an overview of the current usage of the two clusters, which might help to decide which cluster you want to use and set some expectations for compute job waiting times:
File transfer
In week 1, you were shown that you can upload and download files from OSC in the OnDemand Files menu, but that’s only suitable for relatively small transfers. Here is a list of methods to transferr files between your computer and OSC:
| Method | Transfer size | CLI or GUI | Ease of use | Flexibility/options |
|---|---|---|---|---|
| OnDemand Files menu | smaller (<1GB) | GUI | Easy | Limited |
| Remote transfer commands | smaller (<1GB) | CLI | Moderate | Extensive |
| SFTP | larger (>1GB) | Either | Moderate | Limited |
| Globus | larger (>1GB) | GUI | Moderate | Extensive |
For more details, see the self-study section at the bottom of this page.
Putting it together
Let’s take a look at the specs for Owens now that we understand a supercomputer’s components a bit better:
- When you use OSC, it’s good practice to acknowledge and cite OSC in your papers, see their citation page.
- For many questions such as if you have problems with your account, have problems installing or using specific software, or don’t understand why your jobs keep failing, you can email OSC at oschelp@osc.edu. They are usually very quick to respond!
Self-study material: More on file transfer
Remote transfer commands
For small transfers, an alternative to the OnDemand Files menu is using remote transfer commands like scp, rsync, or rclone. These commands can be more convenient than OnDemand especially if you want to keep certain directories synced between OSC and your computer.
Because at OSC, these transfers will happen using a login node, these commands are unfortunately not recommended for large transfers3.
scp
One option is scp (secure copy), which works much like the regular cp command, including the need for the -r option for recursive transfers. The key difference is that we have to somehow refer to a path on a remote computer, and we do so by starting with the remote computer’s address, followed by :, and then the path:
# Copy from remote (OSC) to local (your computer):
scp <user>@pitzer.osc.edu:<remote-path> <local-path>

# Copy from local (your computer) to remote (OSC)
scp <local-path> <user>@pitzer.osc.edu:<remote-path>
Here are two examples of copying from OSC to your local computer:
# Copy a file from OSC to a local computer - namely, to your current working dir ('.'):
scp jelmer@pitzer.osc.edu:/fs/ess/PAS0471/jelmer/mcic-scripts/misc/fastqc.sh .

# Copy a directory from OSC to a local computer - namely, to your home dir ('~'):
scp -r jelmer@pitzer.osc.edu:/fs/ess/PAS0471/jelmer/mcic-scripts ~
And two examples of copying from your local computer to OSC:
# Copy a file from your computer to OSC --
# namely, a file in from your current working dir to your home dir at OSC:
scp fastqc.sh jelmer@pitzer.osc.edu:~

# Copy a file from my local computer's Desktop to the Scratch dir for PAS0471:
scp /Users/poelstra.1/Desktop/fastqc.sh jelmer@pitzer.osc.edu:/fs/scratch/PAS0471
Some nuances for remote copying:
- For both transfer directions (remote-to-local and local-to-remote), you issue the copying commands from your local computer.
- The path for the remote computer (OSC) should always be absolute but that for your local computer can be relative or absolute.
- Since all files can be accessed at the same paths at Pitzer and at Owens, it doesn’t matter whether you use
@pitzer.osc.eduor@owens.osc.eduin thescpcommand.
If your OneDrive is mounted on or synced to your local computer (i.e., if you can see it in your computer’s file brower), you can also transfer directly between OSC and OneDrive. For example, the path to my OneDrive files on my laptop is:
/Users/poelstra.1/Library/CloudStorage/OneDrive-TheOhioStateUniversity.
So if I had a file called fastqc.sh in my top-level OneDrive dir, I could transfer it to my Home dir at OSC as follows:
scp /Users/poelstra.1/Library/CloudStorage/OneDrive-TheOhioStateUniversity jelmer@pitzer.osc.edu:~rsync
Another option, which I can recommend, is the rsync command, especially when you have directories that you repeatedly want to sync: rsync won’t copy any files that are identical in source and destination.
A useful combination of options is -avz --progress:
-aenables archival mode (among other things, this makes it work recursively).-vincreases verbosity — tells you what is being copied.-zenables compressed file transfer (=> generally faster).--progressto show transfer progress for individual files.
The way to refer to remote paths is the same as with scp. For example, I could copy a dir_with_results in my local Home dir to my OSC Home dir as follows:
rsync -avz --progress ~/dir_with_results jelmer@owens.osc.edu:~rsync (Click to expand)
One tricky aspect of using rsync is that the presence/absence of a trailing slash for source directories makes a difference for its behavior. The following commands work as intended — to create a backup copy of a scripts dir inside a dir called backup4:
# With trailing slash: copy the *contents* of source "scripts" into target "scripts":
rsync -avz scripts/ backup/scripts

# Without trailing slash: copy the source dir "scripts" into target dir "backup"
rsync -avz scripts backup
But these commands don’t:
# This would result in a dir 'backup/scripts/scripts':
rsync -avz scripts backup/scripts

# This would copy the files in "scripts" straight into "backup":
rsync -avz scripts/ backup
SFTP
The first of two options for larger transfers is SFTP. You can use the sftp command when you have access to a Unix shell on your computer, and this what I’ll cover below.
Logging in
To log in to OSC’s SFTP server, issue the following command in your local computer’s terminal, substituting <user> by your OSC username:
sftp <user>@sftp.osc.edu # E.g., 'jelmer@sftp.osc.edu'The authenticity of host 'sftp.osc.edu (192.148.247.136)' can't be established.
ED25519 key fingerprint is SHA256:kMeb1PVZ1XVDEe2QiSumbM33w0SkvBJ4xeD18a/L0eQ.
This key is not known by any other names
Are you sure you want to continue connecting (yes/no/[fingerprint])?If this is your first time connecting to OSC SFTP server, you’ll get a message like the one shown above: you should type yes to confirm.
Then, you may be asked for your OSC password, and after that, you should see a “welcome” message like this:
******************************************************************************

This system is for the use of authorized users only.  Individuals using
this computer system without authority, or in excess of their authority,
are subject to having all of their activities on this system monitored
and recorded by system personnel.  In the course of monitoring individuals
improperly using this system, or in the course of system maintenance,
the activities of authorized users may also be monitored.  Anyone using
this system expressly consents to such monitoring and is advised that if
such monitoring reveals possible evidence of criminal activity, system
personnel may provide the evidence of such monitoring to law enforcement
officials.

******************************************************************************
Connected to sftp.osc.edu.
Now, you will have an sftp prompt (sftp>) instead of a regular shell prompt.
Familiar commands like ls, cd, and pwd will operate on the remote computer (OSC, in this case), and there are local counterparts for them: lls, lcd, lpwd — for example:
# NOTE: I am prefacing sftp commands with the 'sftp>' prompt to make it explicit
#       these should be issued in an sftp session; but don't type that part.
sftp> pwd
Remote working directory: /users/PAS0471/jelmersftp> lpwdLocal working directory: /Users/poelstra.1/DesktopUploading files to OSC
To upload files to OSC, use sftp’s put command.
The syntax is put <local-path> <remote-path>, and unlike with scp etc., you don’t need to include the address to the remote (because in an stfp session, you are simultaneously connected to both computers). But like with cp and scp, you’ll need the -r flag for recursive transfers, i.e. transferring a directory and its contents.
# Upload fastqc.sh in a dir 'scripts' on your local computer to the PAS0471 Scratch dir:
sftp> put scripts/fastqc.sh /fs/scratch/PAS0471/sandbox

# Use -r to transfer directories:
sftp> put -r scripts /fs/scratch/PAS0471/sandbox

# You can use wildcards to upload multiple files:
sftp> put scripts/*sh /fs/scratch/PAS0471/sandbox
sftp is rather primitive
The ~ shortcut to your Home directory does not work in sftp! sftp is generally quite primitive and you also cannot use, for example, tab completion or the recalling of previous commands with the up arrow.
Downloading files from OSC
To download files from OSC, use the get command, which has the syntax get <remote-path> <local-path> (this is the other way around from put in that the remote path comes first, but the same in that both use the order <source> <target>, like cp and so on).
For example:
sftp> get /fs/scratch/PAS0471/mcic-scripts/misc/fastqc.sh .

sftp> get -r /fs/scratch/PAS0471/sandbox/ .
Closing the SFTP connection
When you’re done, you can type exit or press Ctrl+D to exit the sftp prompt.
Globus
The second option for large transfers is Globus, which has a browser-based GUI, and is especially your best bet for very large transfers. Some advantages of using Globus are that:
- It checks whether all files were transferred correctly and completely
- It can pause and resume automatically when you e.g. turn off your computer for a while
- It can be used to share files from OSC directly with collaborators even at different institutions.
Globus does need some setup, including the installation of a piece of software that will run in the background on your computer.
- Globus installation and configuration instructions: Windows / Mac / Linux
- Globus transfer instructions
- OSC’s page on Globus
Footnotes
And file sharing / collaborating is also a bit more difficult with home dirs.↩︎
Copying of files back-and-forth, and making sure your results are not lost upon some kind of failure.↩︎
This may be different at other supercomputer centers: there are no inherent transfer size limitations to these commands.↩︎
For simplicity, these commands are copying between local dirs, which is also possible with
rsync.↩︎