Computing Environment for HTS Analysis
Week 3 lab – part 1

1 Introduction
1.1 Today’s lab
In today’s lab:
You will first learn about what kind of computing environment is commonly used for analyzing high-throughput sequencing (HTS) data – this page, part I.
Then, you’ll work in this environment to explore an HTS dataset. You’ll check out HTS read and reference genome files, and perform read quality control – part II.
1.2 Goals for this part
- Learn what computing environment is commonly used for genomics analyses
- Understand the basics of supercomputers
- Learn how to access Ohio Supercomputer Center (OSC) resources
- Take your first steps in the command-line interface of the Unix shell
2 Overview of the computing environment for HTS analysis
Due in large part to the amount of data involved, a personal computer is often not sufficient to work with HTS data. Additionally, most of the specialized programs that help you analyze your data can only be run through a “command-line interface”, in which you type commands rather than point-and-click.
Therefore, a typical computing environment -the computer hardware and software- for HTS data analysis includes:
- A supercomputer — here, the Ohio Supercomputer Center (OSC)
- The Unix shell (terminal) and command-line programs that run in it
- R (or Python) for statistical analysis and visualization.
Today, you will see the first two of these components in action. In today’s first part, you’ll build some familiarity with them, and in the next part, you’ll use them to explore reference genome and HTS read data. (In next week’s lab, we will cover the third item in the context of RNA-Seq differential expression analysis.)
3 The Ohio Supercomputer Center (OSC)
3.1 Introduction to supercomputers
A supercomputer (also known as a “cluster”) consists of many computers that are connected by a high-speed network and can be accessed remotely by its users. You can think of it simply as a network of computers — with individual computers called “nodes”.
Supercomputers provide two main types of resources:
- Compute: computing power to run your data processing and analysis
- File storage: space for storage of your data and results
Why might you need a supercomputer?
- Often, your HTS dataset is too large to be handled efficiently, or at all, by a laptop/desktop computer
- To speed up analyses by using more computing power and/or running them in parallel
- It’s also a great place to store large amounts of data — and HTS data is often very large
3.2 Introduction to OSC
![]()
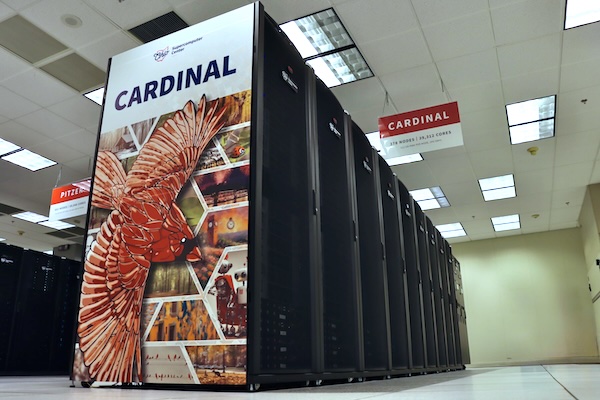
The Ohio Supercomputer Center (OSC) provides computing resources to researchers and others across Ohio1. It currently has three supercomputers – this is what “Cardinal”, one of those, physically looks like:
The structure of an OSC supercomputer
You can think of a supercomputer as having three main parts:
- Login Nodes: The handful of computers that you end up on after logging in
- Compute Nodes: The many computers you can reserve to run your analyses
- File Systems: Where files are stored2
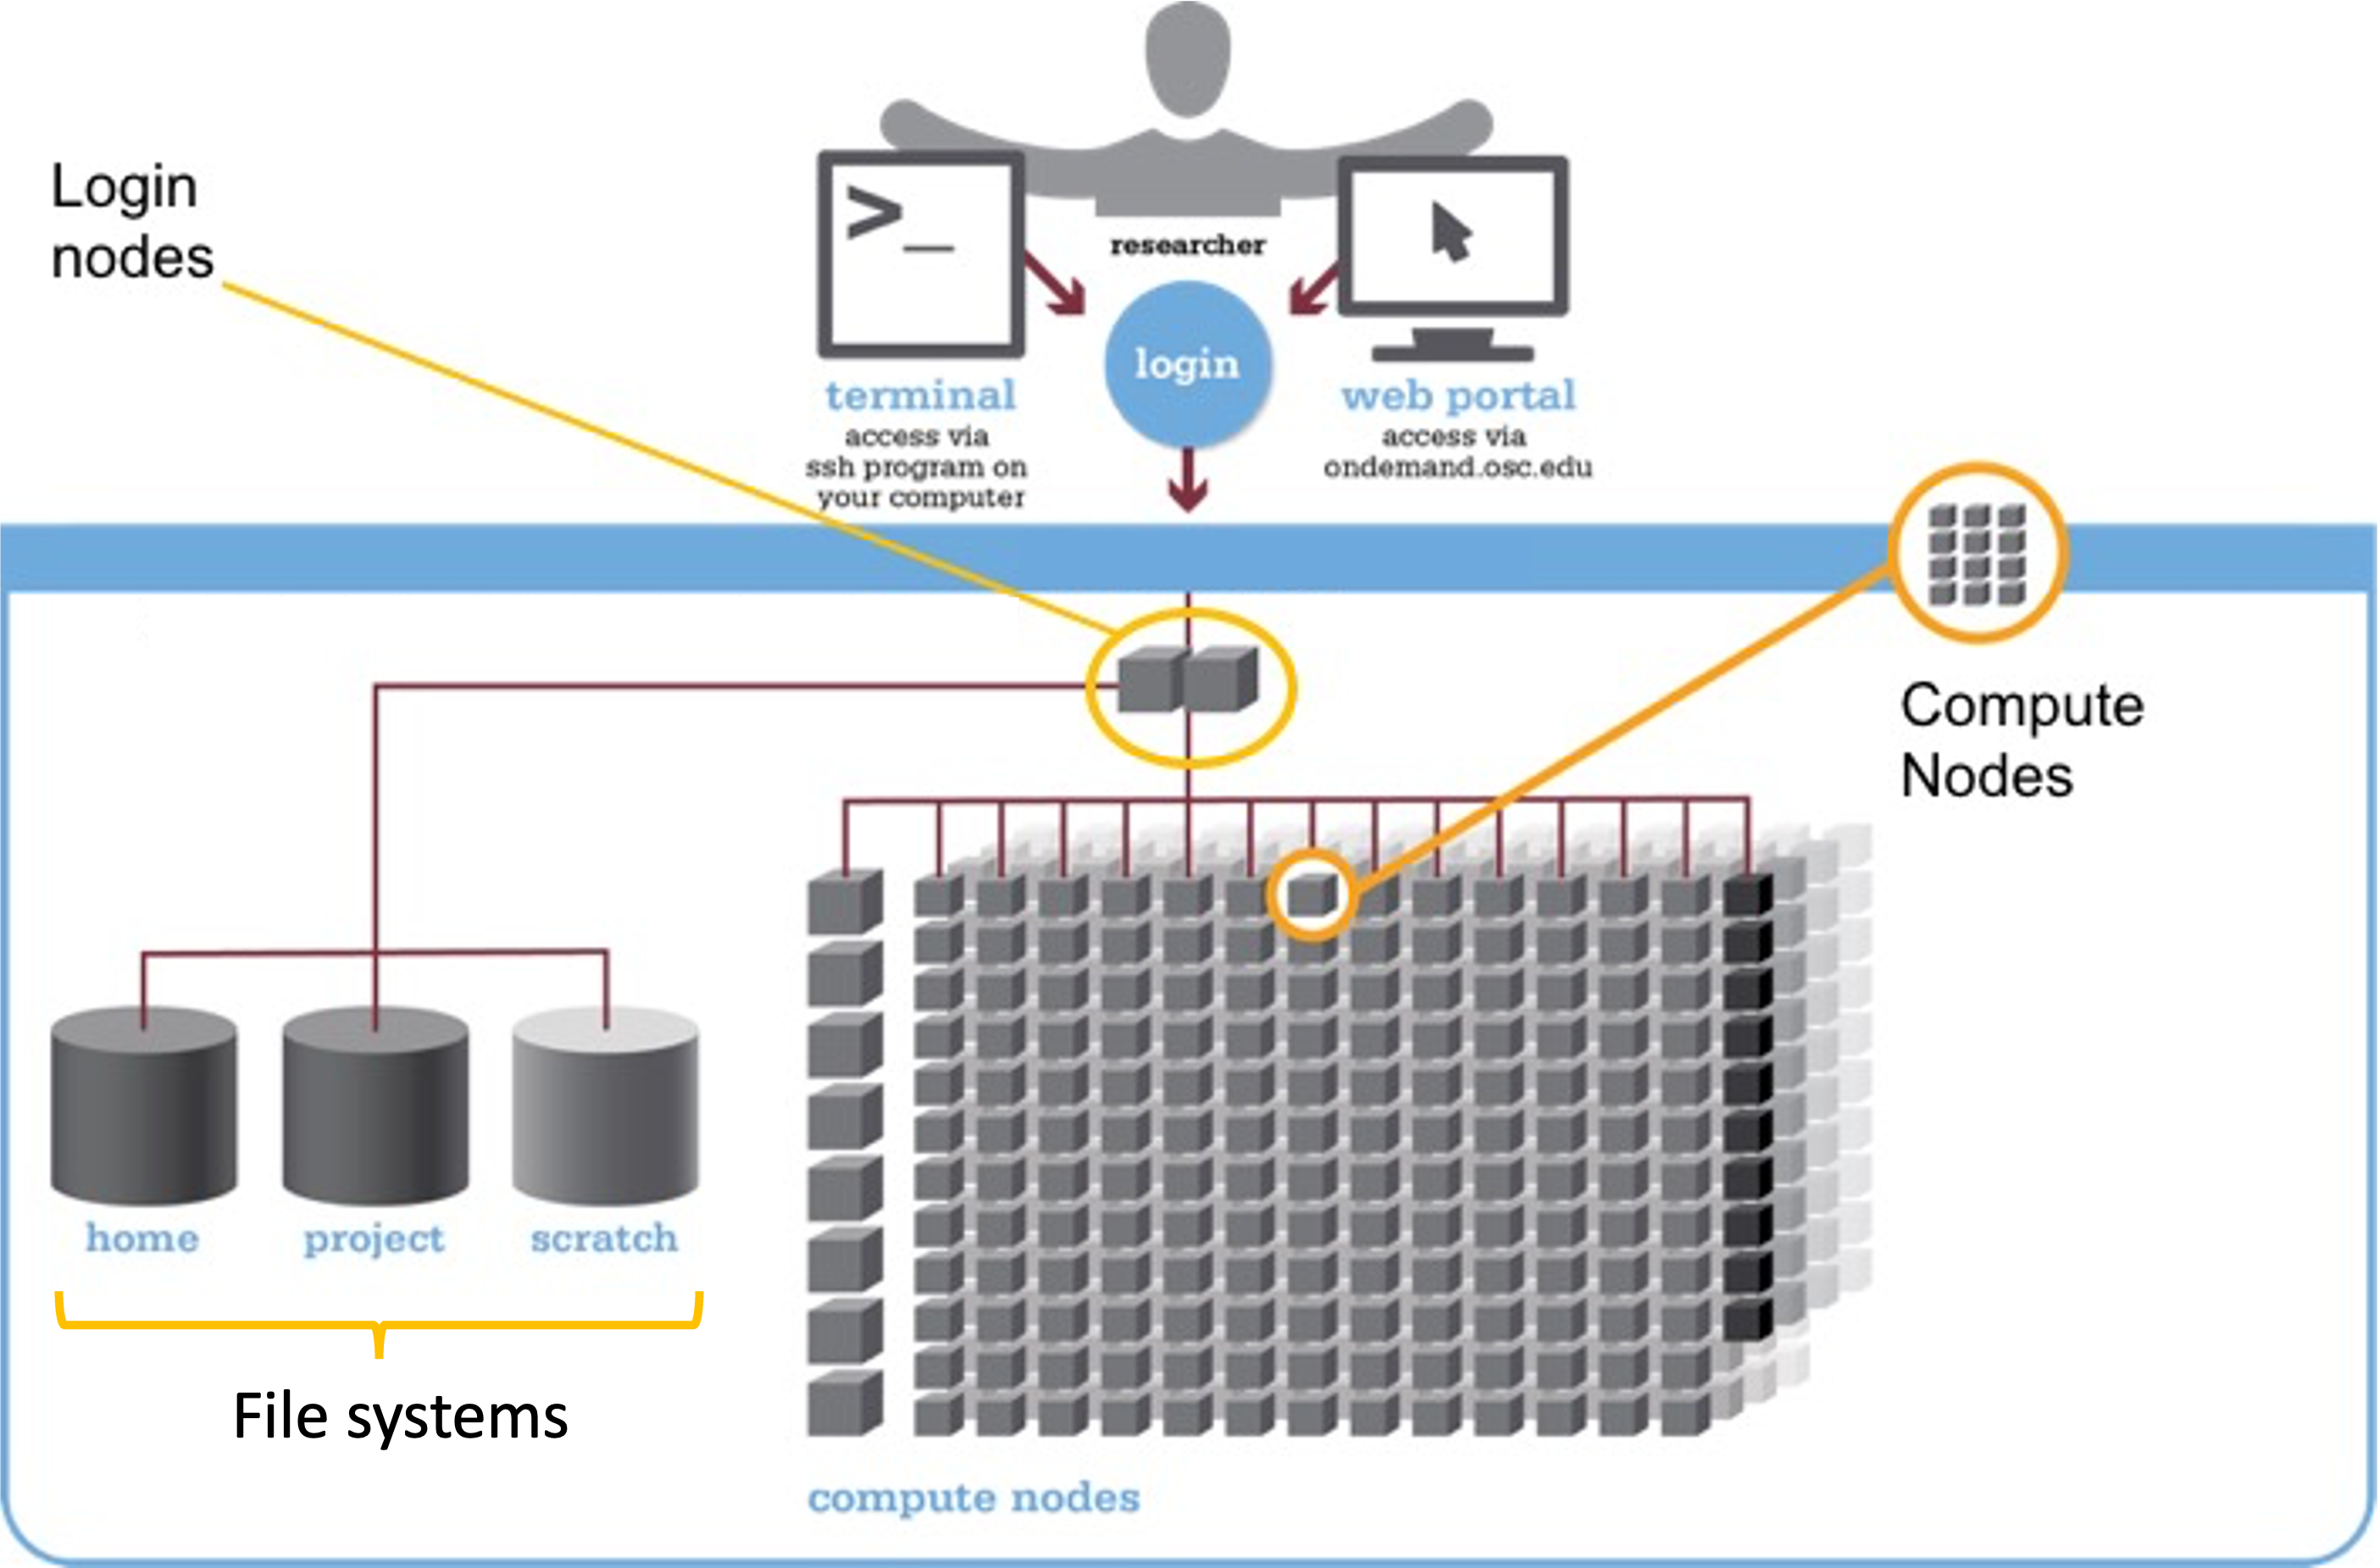
Access to OSC storage space and compute nodes is managed through projects. For this course, we have a project called PAS2880, which you have been added to.
4 The OSC OnDemand web portal
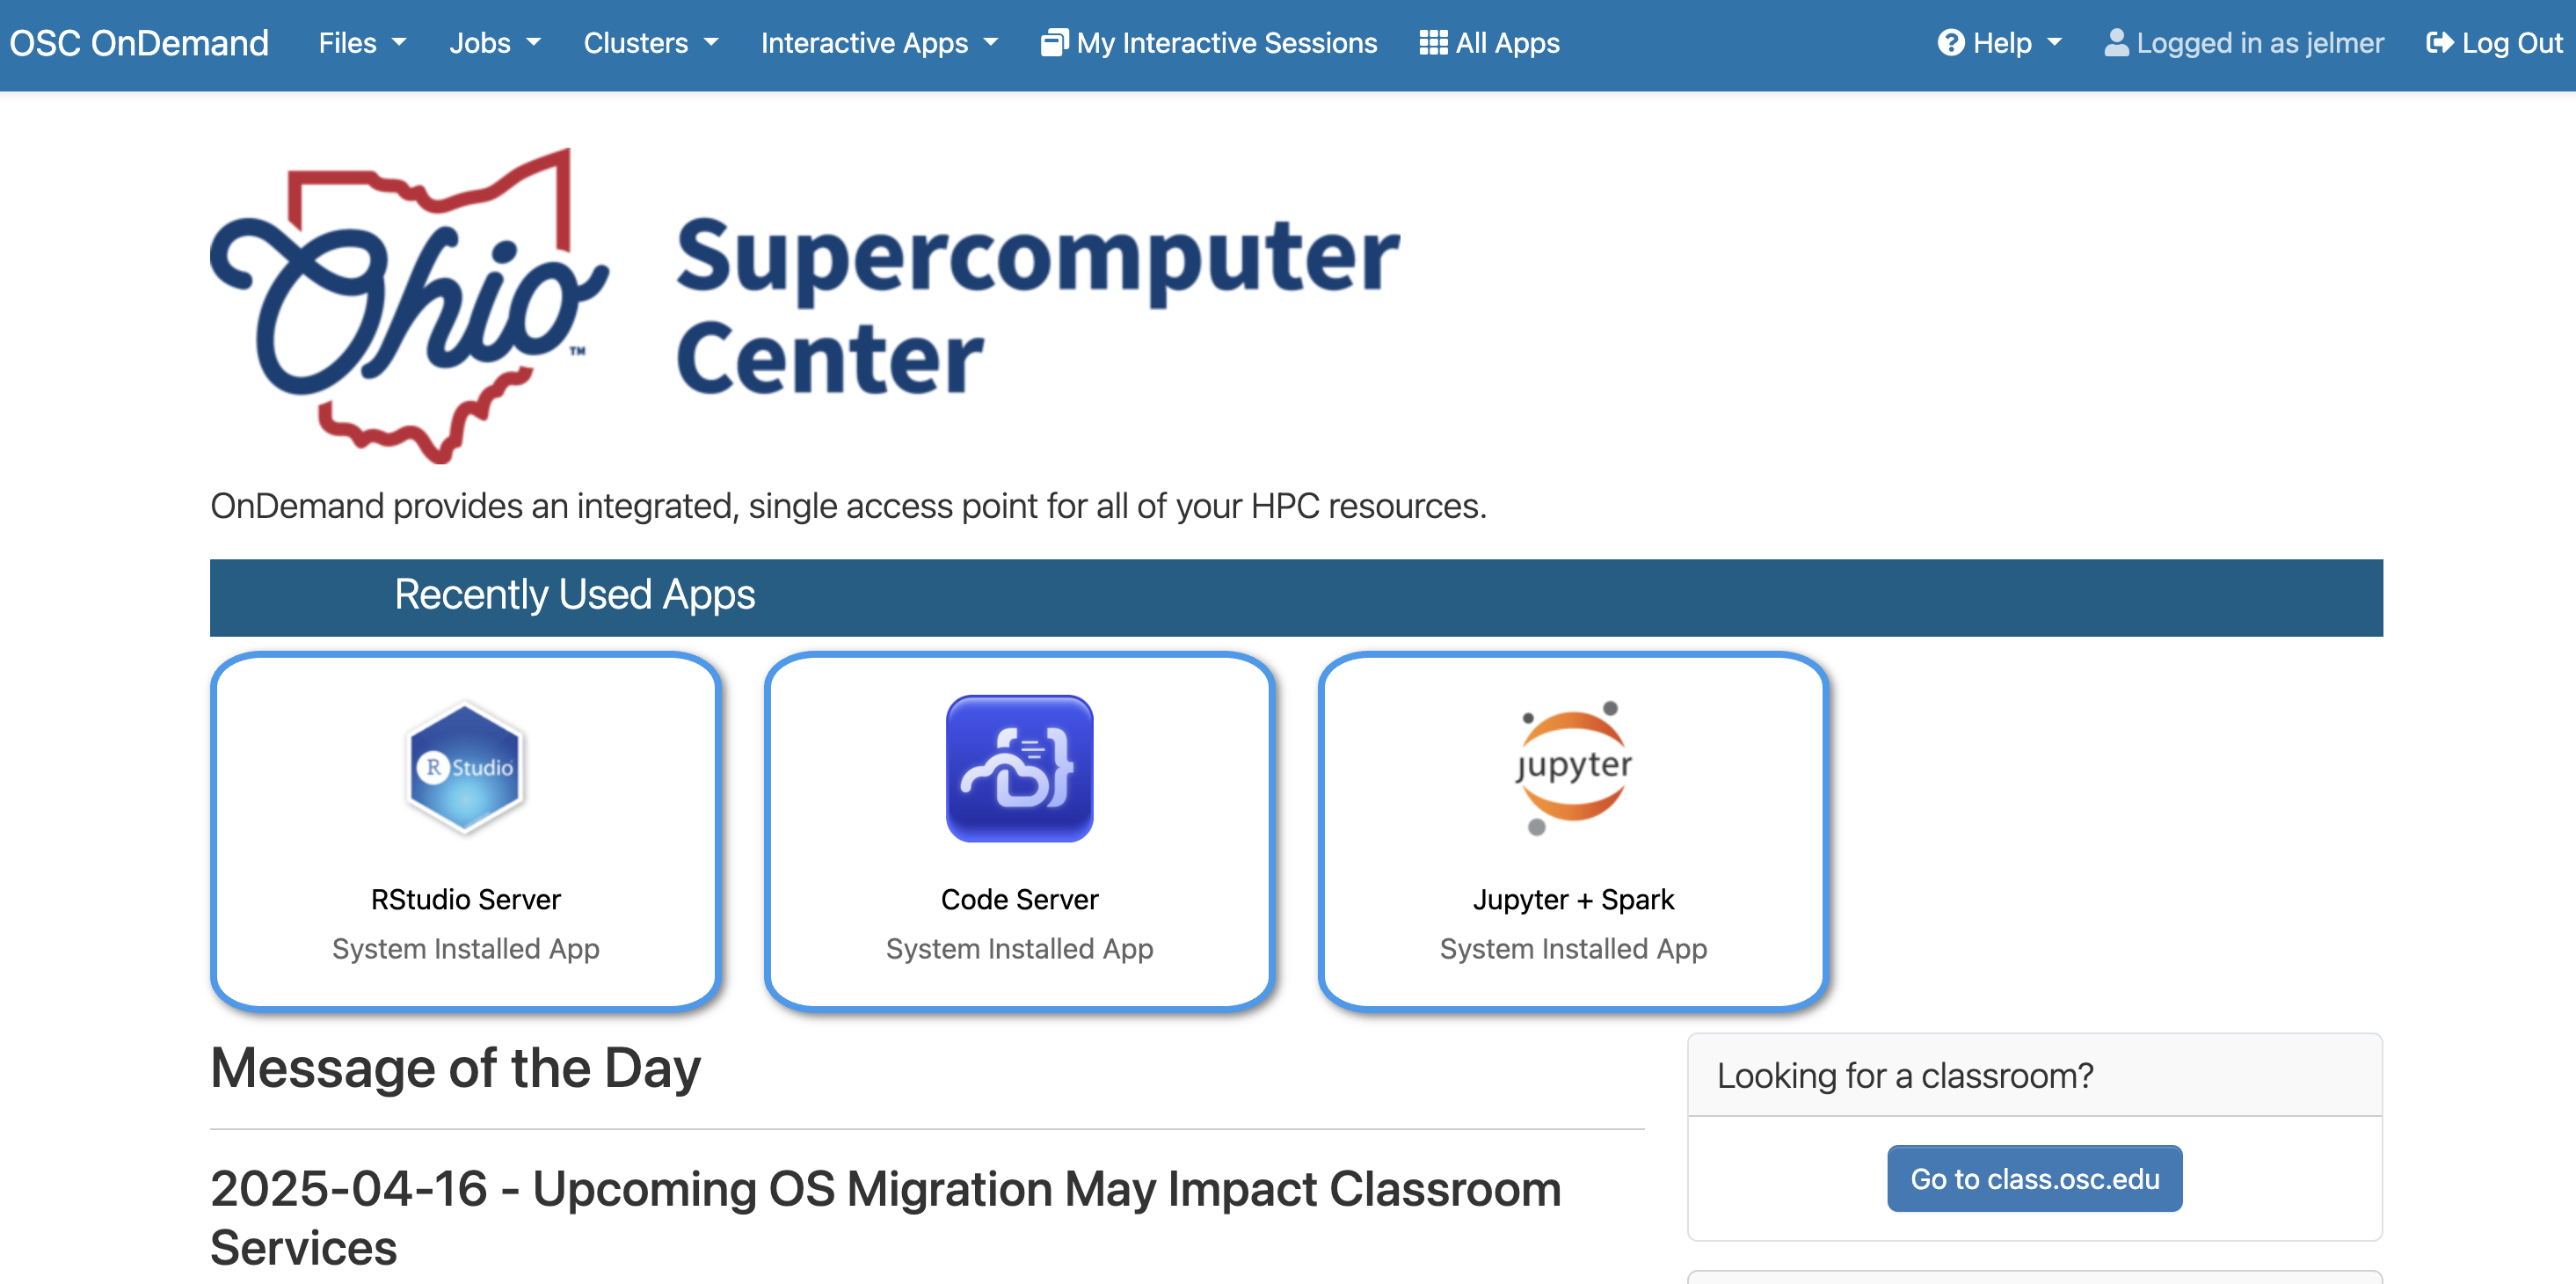
Go to https://ondemand.osc.edu. Use the username + password login option on the left-hand side to log in with your OSC (not OSU!) credentials. Once logged in, you should see a landing page similar to the one below:
Let’s go through some of the dropdown menus in the blue bar along the top.
4.1 Files menu
Hovering over the Files dropdown menu gives a list of “top-level” folders you have access to:
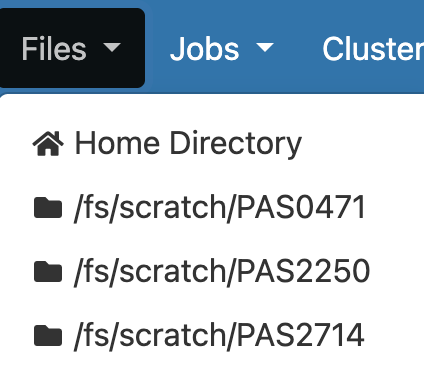
If your account is brand new, you should only see three folders listed, two of which are related to the OSC project we are using in these labs, which is called PAS2880:
- Home Directory – for miscellaneous personal files
/fs/scratch/PAS2880– the “scratch” folder for temporary storage for projectPAS2880/fs/ess/PAS2880– the “project” folder for permanent storage for projectPAS2880
Click on the PAS2880 scratch folder, /fs/scratch/PAS2880: you should see the folders and files that are present there, and be able to click on folders to explore their contents. Then, click on the ENT6703 folder, which we’ll be using for these labs, and you should see something like the following:
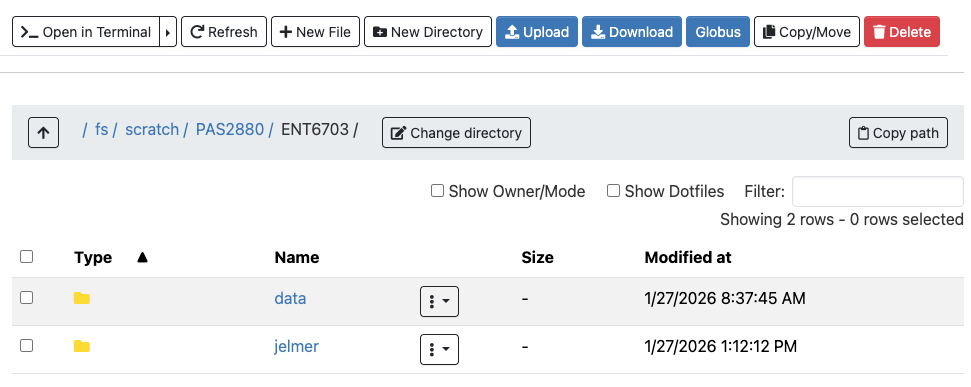
This interface is much like the file browser on your own computer, so you can create, delete, move, copy files and folders. Additionally, you can upload (from your computer to OSC) and download (from OSC your computer) files – see the buttons across the top.
Create your own folder by clicking the New Directory button at the top. Give it the exact same name as your OSC username, including any capitalization. (I’ll refer to this folder as your personal folder from now on.)
If in doubt, you can see what your username is by looking at the right side of the blue top bar:

Exercise: Understanding file/folder locations
Click on your personal folder to enter it.
Take a look at the so-called “path” (file/folder location) shown at the top of the file browser, next to “Change directory”. How do you interpret this notation: what do the forward slashes / indicate, and what does each part in between represent? (It may help to click back-and-forth between folders to see how the path changes.) Does this seem fundamentally different from the file system on your own computer?
Click for the solution
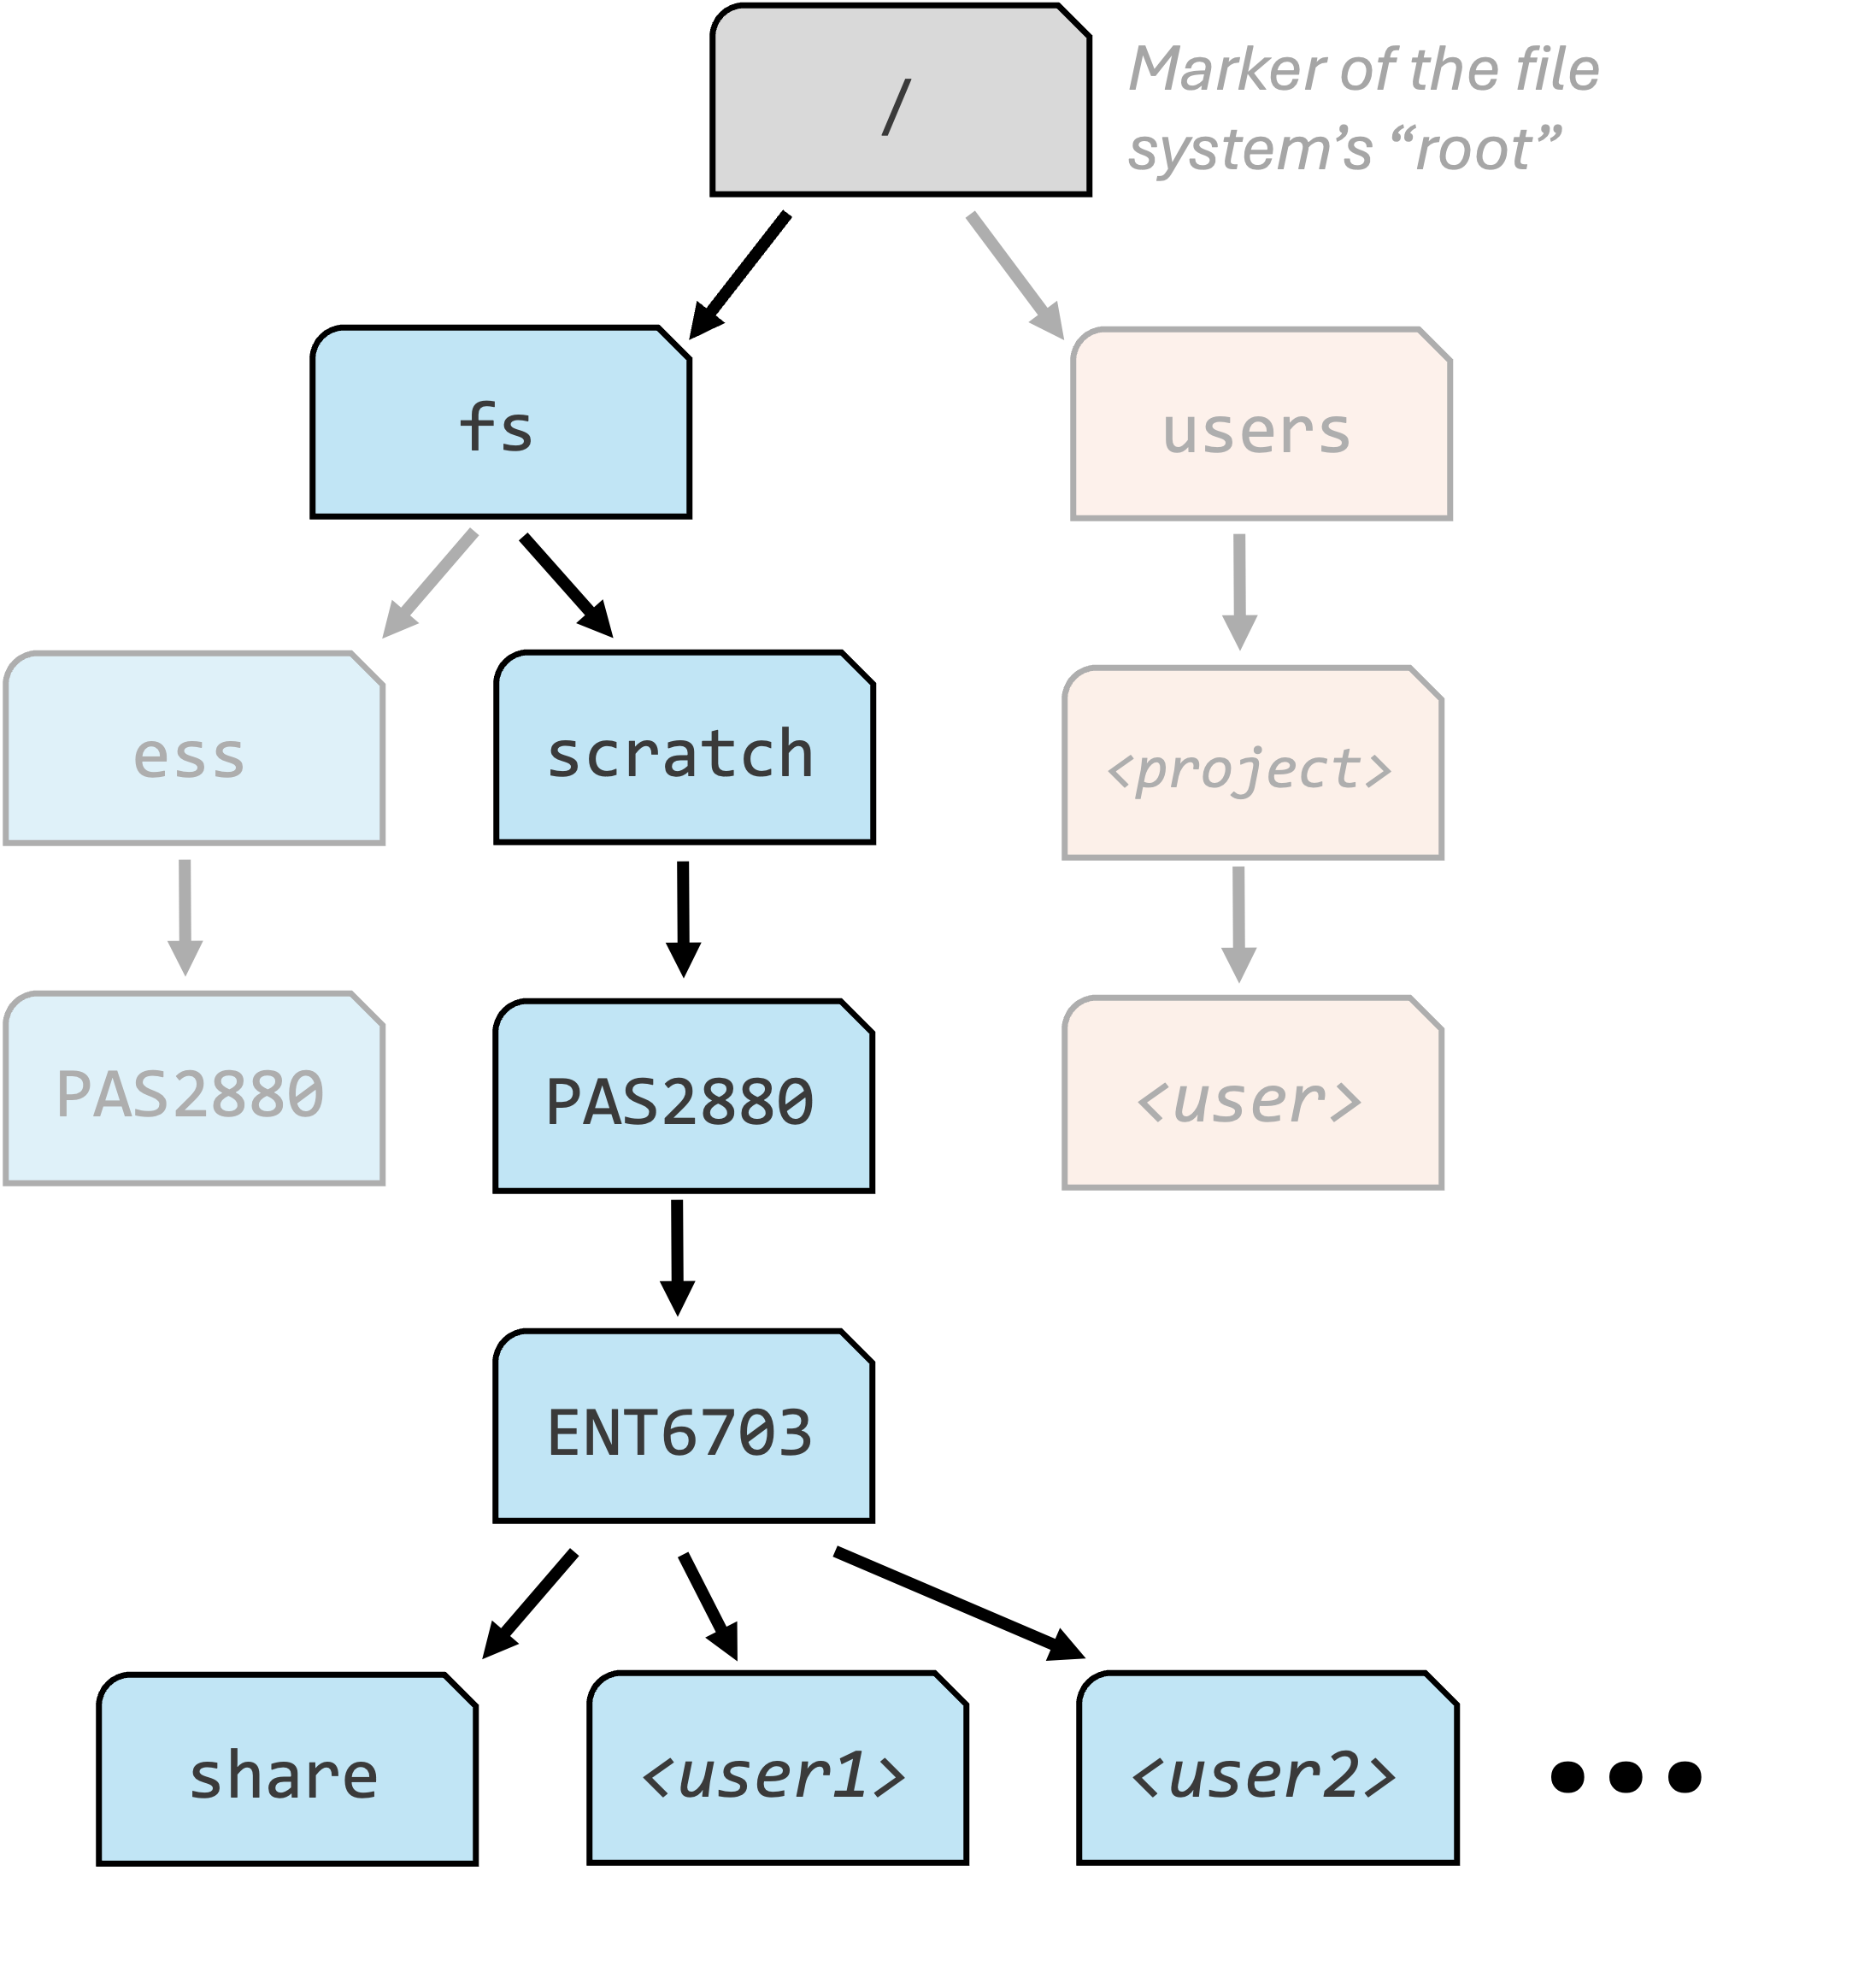
The forward slashes / separate folders in a path. Each part in between, then, represents a folder.
The path is hierarchical and you should read it from left (top-level folder) to right (subfolders): For example, in
/fs/scratch/PAS2880/ENT6703:/fsis a top-level folder – you can always distinguish a top-level folder because the path starts with a forward slash /- inside that is the
scratchfolder - inside that is the
PAS2880folder - inside that is the
ENT6703folder
File systems on personal computers are structured very similarly. But on Windows, among some other differences, backslashes \ are used instead of forward slashes / to separate folders.
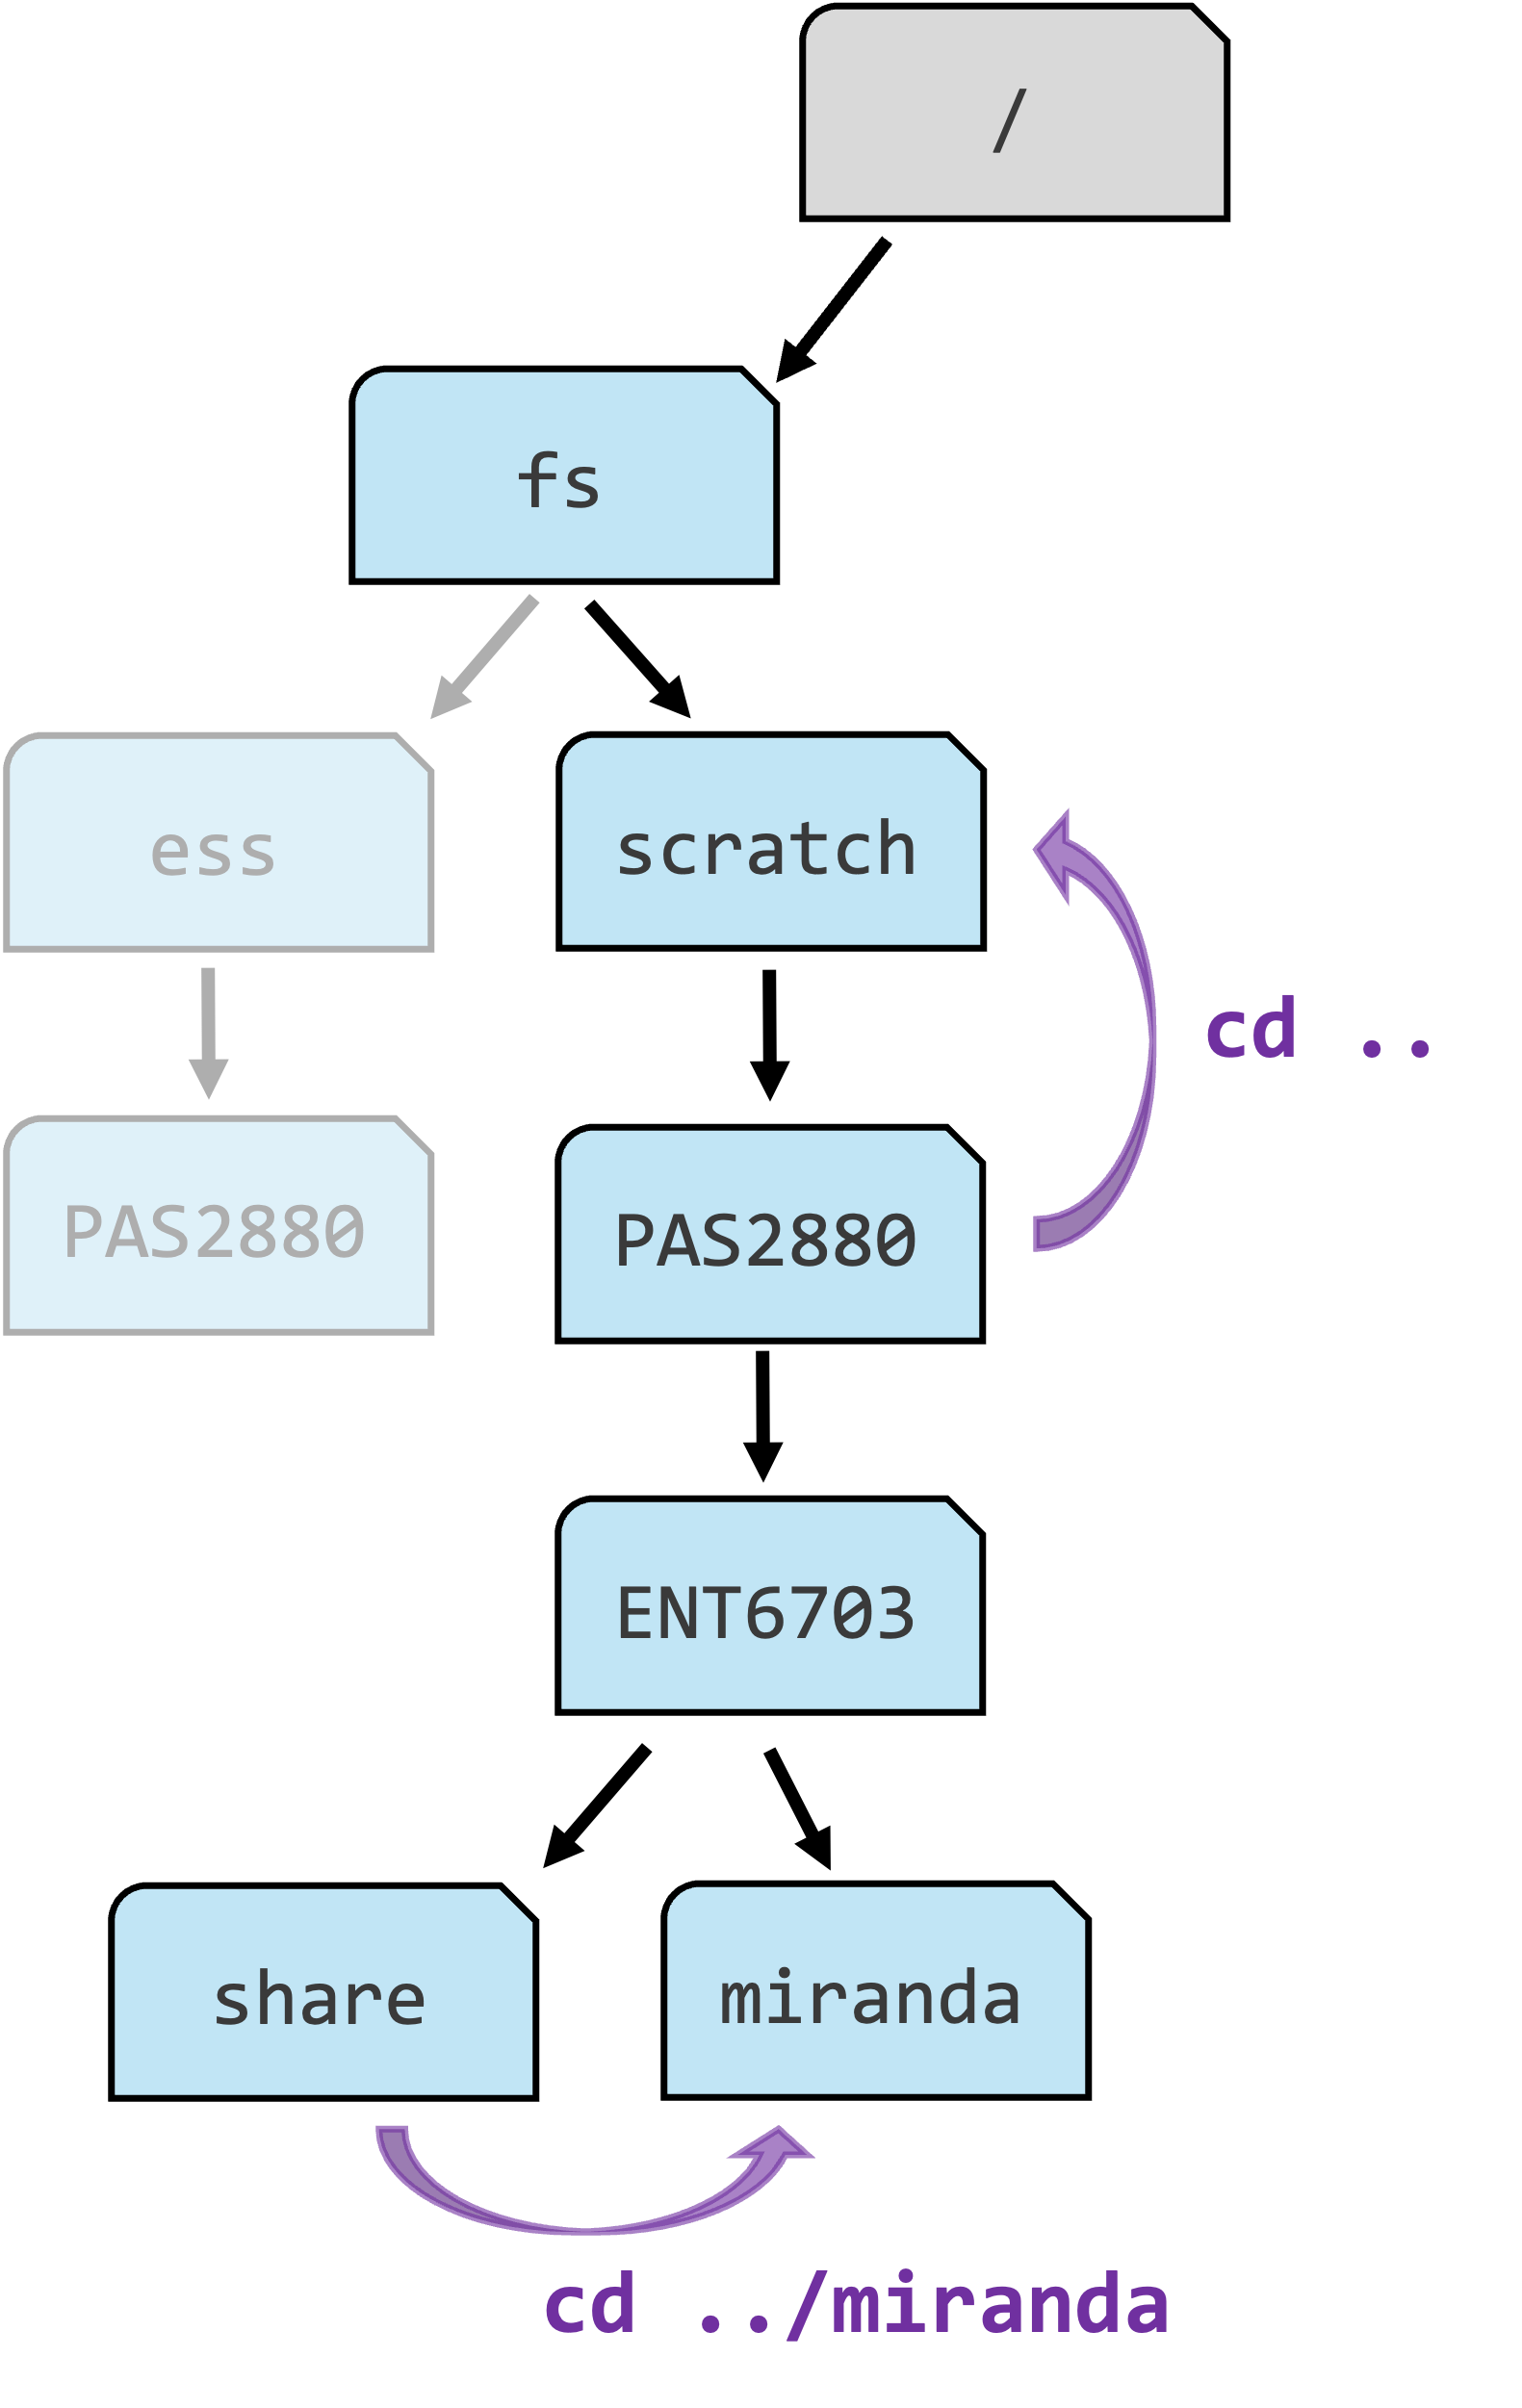
Click to see a diagram of the OSC file system
If someone made a folder
mirandainside theENT6703folder, what would be the path to that folder?Click for the solution
The path would be
/fs/scratch/PAS2880/ENT6703/miranda.
4.2 Interactive Apps
You can access a bunch of software via the Interactive Apps dropdown menu. We won’t use any of these today, but in next week’s homework and lab, you will use RStudio (“RStudio Server”) from this menu.
4.3 Clusters menu: Shell access
We’ll now open a Unix shell, which you’ll get introduced to in the next section. Under the Clusters dropdown menu, you can access a Unix shell on each of the three OSC supercomputers (clusters) – Ascend, Cardinal, or Pitzer:
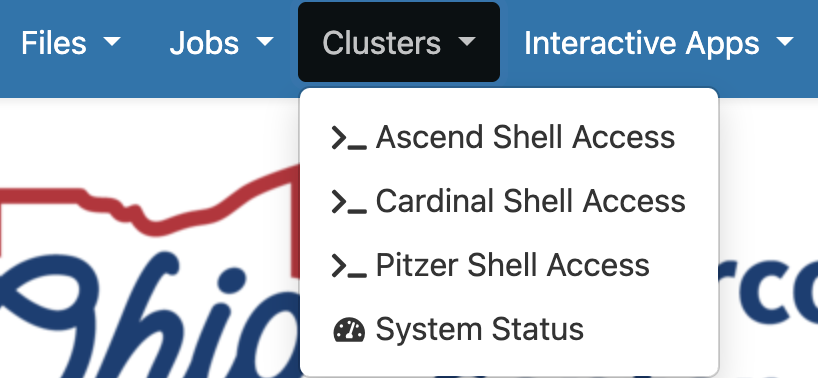
Click on “Cardinal Shell Access”, which will open a new browser tab with a black terminal window.
You can also check out the System Status page from the Clusters menu. This page shows an overview of the live, current usage of the two clusters – just to give you an idea of the scale of the supercomputer center and its usage.

5 The Unix shell
5.1 What is the Unix shell and why use it?
A computer’s shell is an interface inside a Terminal window that allows you to interact with your computer by typing commands. More specifically, the Unix shell is the shell of Unix-based operating systems (Mac and Linux but not Windows). Supercomputers like OSC run on Linux, so the default shell here -and for scientific computing in general- is a Unix shell.
Using the Unix shell is often a necessity when working with HTS data, in order to run the specialized software needed for data processing.
- Automation and efficiency
The shell allows you to repeat and automate tasks easily and without introducing errors. - Reproducibility
When working in the shell, it’s straightforward to keep a detailed record of what you have done. - Viewing and processing large files
Shell commands are excellent at viewing and processing large, plain-text files, which are common in omics data.
5.2 First steps in the Unix shell
The terminal interface
The terminal interface you see after opening the Cardinal Shell Access should look something like this:
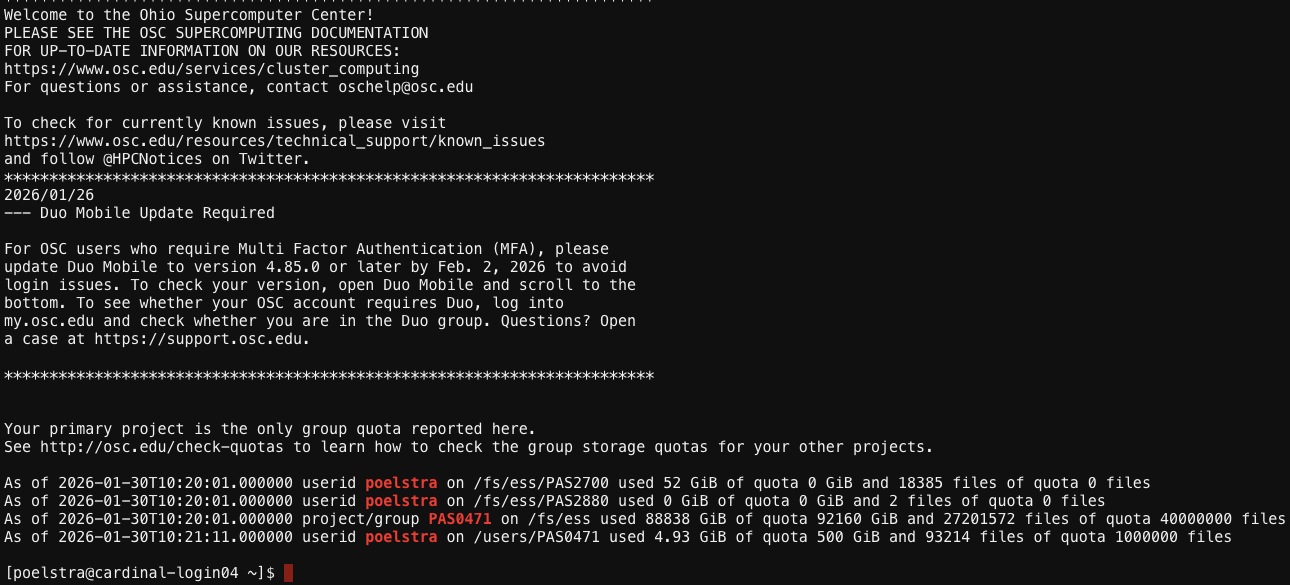
OSC is printing some welcome messages and information about your account. At the bottom is the prompt, where you can type commands. To start with:
I will go ahead and clear the screen, so the prompt is nicely at the top, and will continue to occasionally do that throughout this session. The screen can be cleared with Ctrl + L (both Windows and Mac).
In the top-right corner of the terminal window is a
Themes:dropdown menu, where you can select a different color scheme for the terminal. I prefer light themes and will selectGitHub; you may choose whatever you like.
With a light theme and a cleared screen, the terminal window should now look something like this:

The shell prompt
Inside your terminal, the “prompt” indicates that the shell is ready for a command. Your prompt at OSC should show the following pieces of information:
[<username>@<node-name> <current-folder>]$
For example, below, user jelmer is on node cardinal-login01 in folder ~, where:
- The tilde
~is shorthand for a user’s home folder - You may see a different node name, depending on which login node you happened to be connected to
[jelmer@cardinal-login01 ~]$ The shell is used by typing a command after the dollar sign $, and then pressing Enter to execute it. When the command has finished running, you’ll get your prompt back and can type a new command. Easy! 😃
- The pale gray boxes like the ones shown above are used to show the commands you should type
- From now on, the prompt itself (
[...]$) won’t be shown, only the commands you type - Darker gray boxes (with italic text, below the boxes with commands) show the output of commands
A few simple commands: date, whoami, pwd
The Unix shell comes with hundreds of “commands”: small programs that perform specific actions (if you’ve used R, a Unix command is like an R function). Let’s start with a few simple commands:
The
datecommand prints the current date and time:dateFri Jan 30 14:31:51 EST 2026The
whoami(who-am-i) command prints your username:whoamijelmerThe
pwd-Print Working Directory- command prints the path of the folder you are currently located in – yours will be different than mine.pwd/users/PAS0471/jelmer
All those commands provided us with some output. That output was printed to screen, which is the default behavior for most Unix commands.
- “Directory” or “dir” for short is just a synonym for “folder” – we’ll mostly use “dir” from now on
- When working in a Unix shell, you are always “in” a specific dir, which is called your working dir
- Recall from earlier that a “path”, such as that output by
pwd, specifies the location of a file or dir in a computer’s file system
5.3 cd and command actions & arguments
In the above three examples:
- You merely typed a command and nothing else
- The command provided some information, which was printed to screen
But many commands perform an action other than providing information. For example, you can use the command cd to Change Directory, i.e. change your working dir.
Let’s use cd to navigate to another dir by specifying the path to that directory after the cd command:
cd /fs/scratch/PAS2880/ENT6703/dataIn the live session, I will demonstrate a neat feature called “tab completion”!
Note that cd had no output at all. But it did perform the desired action, which we can see by checking the working directory again with pwd:
pwd/fs/scratch/PAS2880/ENT6703/dataIn more abstract terms, you provided cd with an argument above, namely the path of the dir to navigate to. Arguments generally tell commands what file or directory to operate on.
So, cd gives no output when it succesfully changed the working directory. But let’s also see what happens when it does not succeed — an error appears:
cd /fs/Scratch/PAS2880-bash: cd: /fs/Scratch/PAS2880: No such file or directoryWhat was the problem with the path we specified? Does that surprise you? (Click to see the solution)
We used a capital S in /Scratch/ — this should have been /scratch/.
scratch, typing Scratch will not work!
5.4 ls and command options
The default behavior of ls
The ls command, short for “list”, will list files and directories – by default those present in your current working dir:
lsfastq meta README.md refls output colors (click to expand)
The ls output shown above does not show the different colors you should see in your shell, where:
- Entries in blue are directories (like
fastqandmetaabove) - Entries in black are regular files (like
README.mdabove) - Entries in red are compressed files (you’ll see an example soon)
(Though note that some color schemes may show different colors for these.)
Options (to ls)
The way that ls shows the output can be changed using options. In general, while arguments tell a command what to operate on, options will modify its behavior. For example, we can call ls with the option -l (a dash followed by a lowercase L):
ls -l total 2
drwxr-x--- 2 jelmer PAS0471 4096 Jan 27 08:37 fastq
drwxr-x--- 2 jelmer PAS0471 4096 Jan 27 08:37 meta
-rw-r----- 1 jelmer PAS0471 1539 Jan 27 08:37 README.md
drwxr-x--- 2 jelmer PAS0471 4096 Jan 27 08:37 refNotice that it lists the same items as our first ls call above, but printed in a different format: one item per line, with additional information such as the last-modified date and time, and the file sizes in bytes (to the left of the date).
Let’s add another option, -h:
ls -l -htotal 2.0K
drwxr-x--- 2 jelmer PAS0471 4.0K Jan 27 08:37 fastq
drwxr-x--- 2 jelmer PAS0471 4.0K Jan 27 08:37 meta
-rw-r----- 1 jelmer PAS0471 1.6K Jan 27 08:37 README.md
drwxr-x--- 2 jelmer PAS0471 4.0K Jan 27 08:37 refWhat is different about the output, and what do you think that means? (Click to see the solution)
The only difference is in the format of the column reporting the sizes of the items listed.
You now have “Human-readable filesizes” (hence-h), where sizes on the scale of kilobytes will be shown with Ks, of megabytes with Ms, and of gigabytes with Gs. Minor detail, but this can be quite useful especially for large files.
Conveniently, options can be “pasted together”; ls -lh is equivalent to ls -l -h:
ls -lhtotal 17K
total 2.0K
drwxr-x--- 2 jelmer PAS0471 4.0K Jan 27 08:37 fastq
drwxr-x--- 2 jelmer PAS0471 4.0K Jan 27 08:37 meta
-rw-r----- 1 jelmer PAS0471 1.6K Jan 27 08:37 README.md
drwxr-x--- 2 jelmer PAS0471 4.0K Jan 27 08:37 refCombining options and arguments
Arguments to ls should be dirs or files to operate on. For example, if you wanted to see what’s inside the fastq dir, instead of inside your working dir, we could type:
ls fastqERR10802863_R1.fastq.gz ERR10802865_R2.fastq.gz ERR10802868_R1.fastq.gz ERR10802870_R2.fastq.gz ERR10802875_R1.fastq.gz ERR10802877_R2.fastq.gz ERR10802880_R1.fastq.gz ERR10802882_R2.fastq.gz ERR10802885_R1.fastq.gz
ERR10802863_R2.fastq.gz ERR10802866_R1.fastq.gz ERR10802868_R2.fastq.gz ERR10802871_R1.fastq.gz ERR10802875_R2.fastq.gz ERR10802878_R1.fastq.gz ERR10802880_R2.fastq.gz ERR10802883_R1.fastq.gz ERR10802885_R2.fastq.gz
ERR10802864_R1.fastq.gz ERR10802866_R2.fastq.gz ERR10802869_R1.fastq.gz ERR10802871_R2.fastq.gz ERR10802876_R1.fastq.gz ERR10802878_R2.fastq.gz ERR10802881_R1.fastq.gz ERR10802883_R2.fastq.gz ERR10802886_R1.fastq.gz
ERR10802864_R2.fastq.gz ERR10802867_R1.fastq.gz ERR10802869_R2.fastq.gz ERR10802874_R1.fastq.gz ERR10802876_R2.fastq.gz ERR10802879_R1.fastq.gz ERR10802881_R2.fastq.gz ERR10802884_R1.fastq.gz ERR10802886_R2.fastq.gz
ERR10802865_R1.fastq.gz ERR10802867_R2.fastq.gz ERR10802870_R1.fastq.gz ERR10802874_R2.fastq.gz ERR10802877_R1.fastq.gz ERR10802879_R2.fastq.gz ERR10802882_R1.fastq.gz ERR10802884_R2.fastq.gzAh, FASTQ files! These contain the HTS reads you’ll work with, and you’ll explore them in the second part of this lab.
Finally, you can combine options and arguments, and let’s do so take a closer look at the dir with FASTQ files — now, the -h option is especially useful and allows you see that the FASTQ files are 21-22 Mb in size:
ls -lh fastqtotal 941M
-rw-r----- 1 jelmer PAS0471 21M Jan 27 08:37 ERR10802863_R1.fastq.gz
-rw-r----- 1 jelmer PAS0471 22M Jan 27 08:37 ERR10802863_R2.fastq.gz
-rw-r----- 1 jelmer PAS0471 21M Jan 27 08:37 ERR10802864_R1.fastq.gz
-rw-r----- 1 jelmer PAS0471 22M Jan 27 08:37 ERR10802864_R2.fastq.gz
-rw-r----- 1 jelmer PAS0471 22M Jan 27 08:37 ERR10802865_R1.fastq.gz
-rw-r----- 1 jelmer PAS0471 22M Jan 27 08:37 ERR10802865_R2.fastq.gz
-rw-r----- 1 jelmer PAS0471 21M Jan 27 08:37 ERR10802866_R1.fastq.gz
-rw-r----- 1 jelmer PAS0471 22M Jan 27 08:37 ERR10802866_R2.fastq.gz
[...output truncated...] Exercise: Practice with ls
List the files in the ref dir. What are the file sizes?
Click for the solution
ls -lh reftotal 659M
-rw-r----- 1 jelmer PAS0471 547M Jan 27 08:37 GCF_016801865.2.fna
-rw-r----- 1 jelmer PAS0471 123M Jan 27 08:37 GCF_016801865.2.gtf.fna file (the genome assembly nucleotide FASTA file) is 547 Mb, and the .gtf file (the annotation GTF file) is 123 Mb.
Bonus Exercise: Paths
Earlier with cd, you used long paths like /fs/scratch/PAS2880/ENT6703/data. Here, you used short ones like data and fastq. What is the difference between these kinds of paths – which of the following statements is correct (only one is correct)?
- When you use
cd, you have to use long paths, but withlsyou can use short ones.dataandfastqare just shorter because they are closer to the root of the filesystem, so there are fewer dirs to travel through.- The long paths start from the root of the file system, while the short paths start from your current working dir.
- The long paths are for directories, while the short paths are for files.
Click for the solution
The correct answer is C.
The long paths are called absolute paths, and start from the root of the file system (recognized by a leading slash like in /fs/ess). Making an analogy with geographic locations, you can think of these as GPS coordinates: they always point to the same location, no matter where you currently are.
The short paths are relative paths, starting from your current working dir. Continuing the geographic analogy, these are like giving directions starting from your current location such as “take the second left”.
See the table below for two examples:
| Working dir | Absolute path to another folder | Relative path |
|---|---|---|
/fs/scratch/PAS2880/ENT6703/data |
/fs/scratch/PAS2880/ENT6703/data/fastq |
fastq |
/fs/scratch/PAS2880/ENT6703 |
/fs/scratch/PAS2880/ENT6703/data/fastq |
data/fastq |
5.5 A few more general shell tips
Command history: If you hit the ⇧ (up arrow) once, you’ll retrieve your most recent command, and if you keep hitting it, you’ll go further back. The⇩ (down arrow) will go the other way: towards the present.
Your cursor can be anywhere on a line (not just at the end) when you press Enter to execute a command!
Anything that comes after a
#is considered a comment instead of code!# This entire line is a comment - you can run it and nothing will happen pwd # 'pwd' will be executed but everything after the '#' is ignored/fs/scratch/PAS2880/ENT6703/data
Bonus Exercise: Navigating up
In the first question, did you perhaps find yourself wondering how you can navigate up a level in the file system?
Well: in a path, .. denotes one level up. And ../bla, for example, means one level up and then down into the bla directory.
Try to make use of this construct to navigate into your personal dir and back to data again, instead of using the “full paths” like above. Hint: Tab completion after typing ../ can help you to orient yourself!
Click for the solution
Into your personal dir (replace
jelmerwith your own username):cd ../jelmerBack to
data:cd ../data
Click to see a diagram of using ..